How to Make Your Own Survey in 3 Easy Steps
As a business, you’ve probably mulled over how to make your own survey for market research purposes. The power of survey research is that it allows you to extract data for a wide array of campaigns, such as marketing, advertising, branding et al., on virtually any focal subject of interest.
Surveys are unique in that they collect data from a pre-defined group of people. Online surveys take this method to the next level, as they only permit qualified respondents to enter the questionnaire portion of a survey.
As such, online survey tools allow you to define the participants allowed to take part in your survey; you can do so by selecting your desired demographics and screening questions.
There’s more to making your survey — but not much, that is, depending on the online survey tool you use.
This article will teach you how to build a survey in just 3 steps, a process that correlates with the Pollfish survey platform.
The Benefits of Using Survey Software
Aside from the above, there is an abundance of benefits to using survey software, which is why it is encouraged to make your survey.
If you are skeptical about employing survey software that allows you to build and launch your survey in just three steps, consider the following. It enumerates the various benefits of using a survey platform; the fact that you can make your survey in just 3 steps is an added benefit.
- Cost-Effective: Although the total cost depends on several factors, such as deployment methods, survey types and the stipulations of your online survey platform provider, online surveys are generally cheap. At Pollfish, they start at only $0.95 per complete.
- Versatile: Software survey often offers versatility in functionality, interface, visuals and more. As such, they allow you to create multiple types of surveys such as multiple-choice, ratings surveys and surveys that focus on different disciplines like customer satisfaction or community feedback. They also allow you to add unique features such as advanced skip logic.
- Respondent Control: A potent survey software grants surveys with the ability to identify each respondent by their IP address, so that no person can take part in the same survey twice to skew results. Therefore, if for example, you set your sampling pool to include 1,000 respondents, you can rest assured that there will be 1,000 unique individuals taking the survey, as no responder will take the survey more than once.
- Quick and Accurate: Online survey tools collect data quickly and accurately. They can gather thousands of survey submissions in a short period, one that is often no longer than a few days long. The entire sampling is accurate to the study you conduct, as screening questions and demographic quotas ensure only the targeted respondents participate in the survey.
- Ease of Analysis: Survey software facilitates the process of analyzing, by allowing you to observe the data in various formats. For example, a strong tool gives you the option of viewing your responses in spreadsheets, graphs, charts and cross-tabulation. This allows you to examine your survey results in a way that suits your preferences best, as some campaigns require specific data formats.
- Easily administered and completed: Online survey tools offer the convenience of administration ease and completion. That is because these tools deploy the surveys for you, meaning that you don’t have to worry about reaching your intended target audience and amount of respondents. The Pollfish platform distributes your survey to a sweeping network of over 140,000 of the most popular websites and apps. It doesn’t finish the process until all respondent quotas are filled.
- Flexible and amendable: Online survey platforms ought to make it easy to control all survey content; that involves adding different media files to questions, skipping questions (skip logic), using a blend of open and close-ended questions and much more. In short, survey software makes survey-building easy to tailor and change.
Make Your Own Survey With a 3-Step Process
Now that we’ve covered the bases of online survey advantages, it’s time to put survey building into action. The following elucidates the three steps, or stages, to make your survey using an online survey platform.
These steps parallel the steps required to take on the Pollfish platform dashboard; they make it easy to jumpstart your survey research campaigns.
Beginning a New Survey Project
When you begin a new survey project, you now have three options. You must select the type most appropriate for your needs. To do so, on your survey dashboard, hover over to “Create project,” the big blue button on the upper right side of the screen. Click on it to reveal the two-option dropdown menu. These two options form the basis of your survey campaign type. The two options for creating a new survey project are:
- From Scratch: entails building your survey entirely on your own for custom needs.
- From templates: gives you various templates for building your questionnaire, which you can edit (from moving around the questions, editing the question content, adding new ones, adding media files, etc).
After choosing how you will use the Pollfish platform for your survey project, you will be prompted with the following message:
How would you like to collect responses to your survey?
Here you can choose between buying your responses and sending your survey your way. The latter refers to sending your survey across our vast network of publishers, which includes a bevy of websites, apps and mobile sites. This is part of our random device engagement, a kind of organic sampling in which surveys are distributed randomly to users of different digital spaces. This method allows respondents to take the surveys while they are in their organic environments — cutting back on survey bias.
The latter refers to the Distribution Link feature, in which you can send surveys to specific respondents, rather than through a massive network. Out of the many survey sampling methods, this is a non-probability sampling method. This means it is not random and designed to target people you either know, such as in the case of B2B surveys, or, consumers and other web users who have given you their contact information.
This feature also offers convenience sampling, in that it generates a link you can use at various digital properties to send people to your surveys. Willing respondents can then partake in your survey after coming upon your link on social media, landing pages, site pages, your homepage, etc.
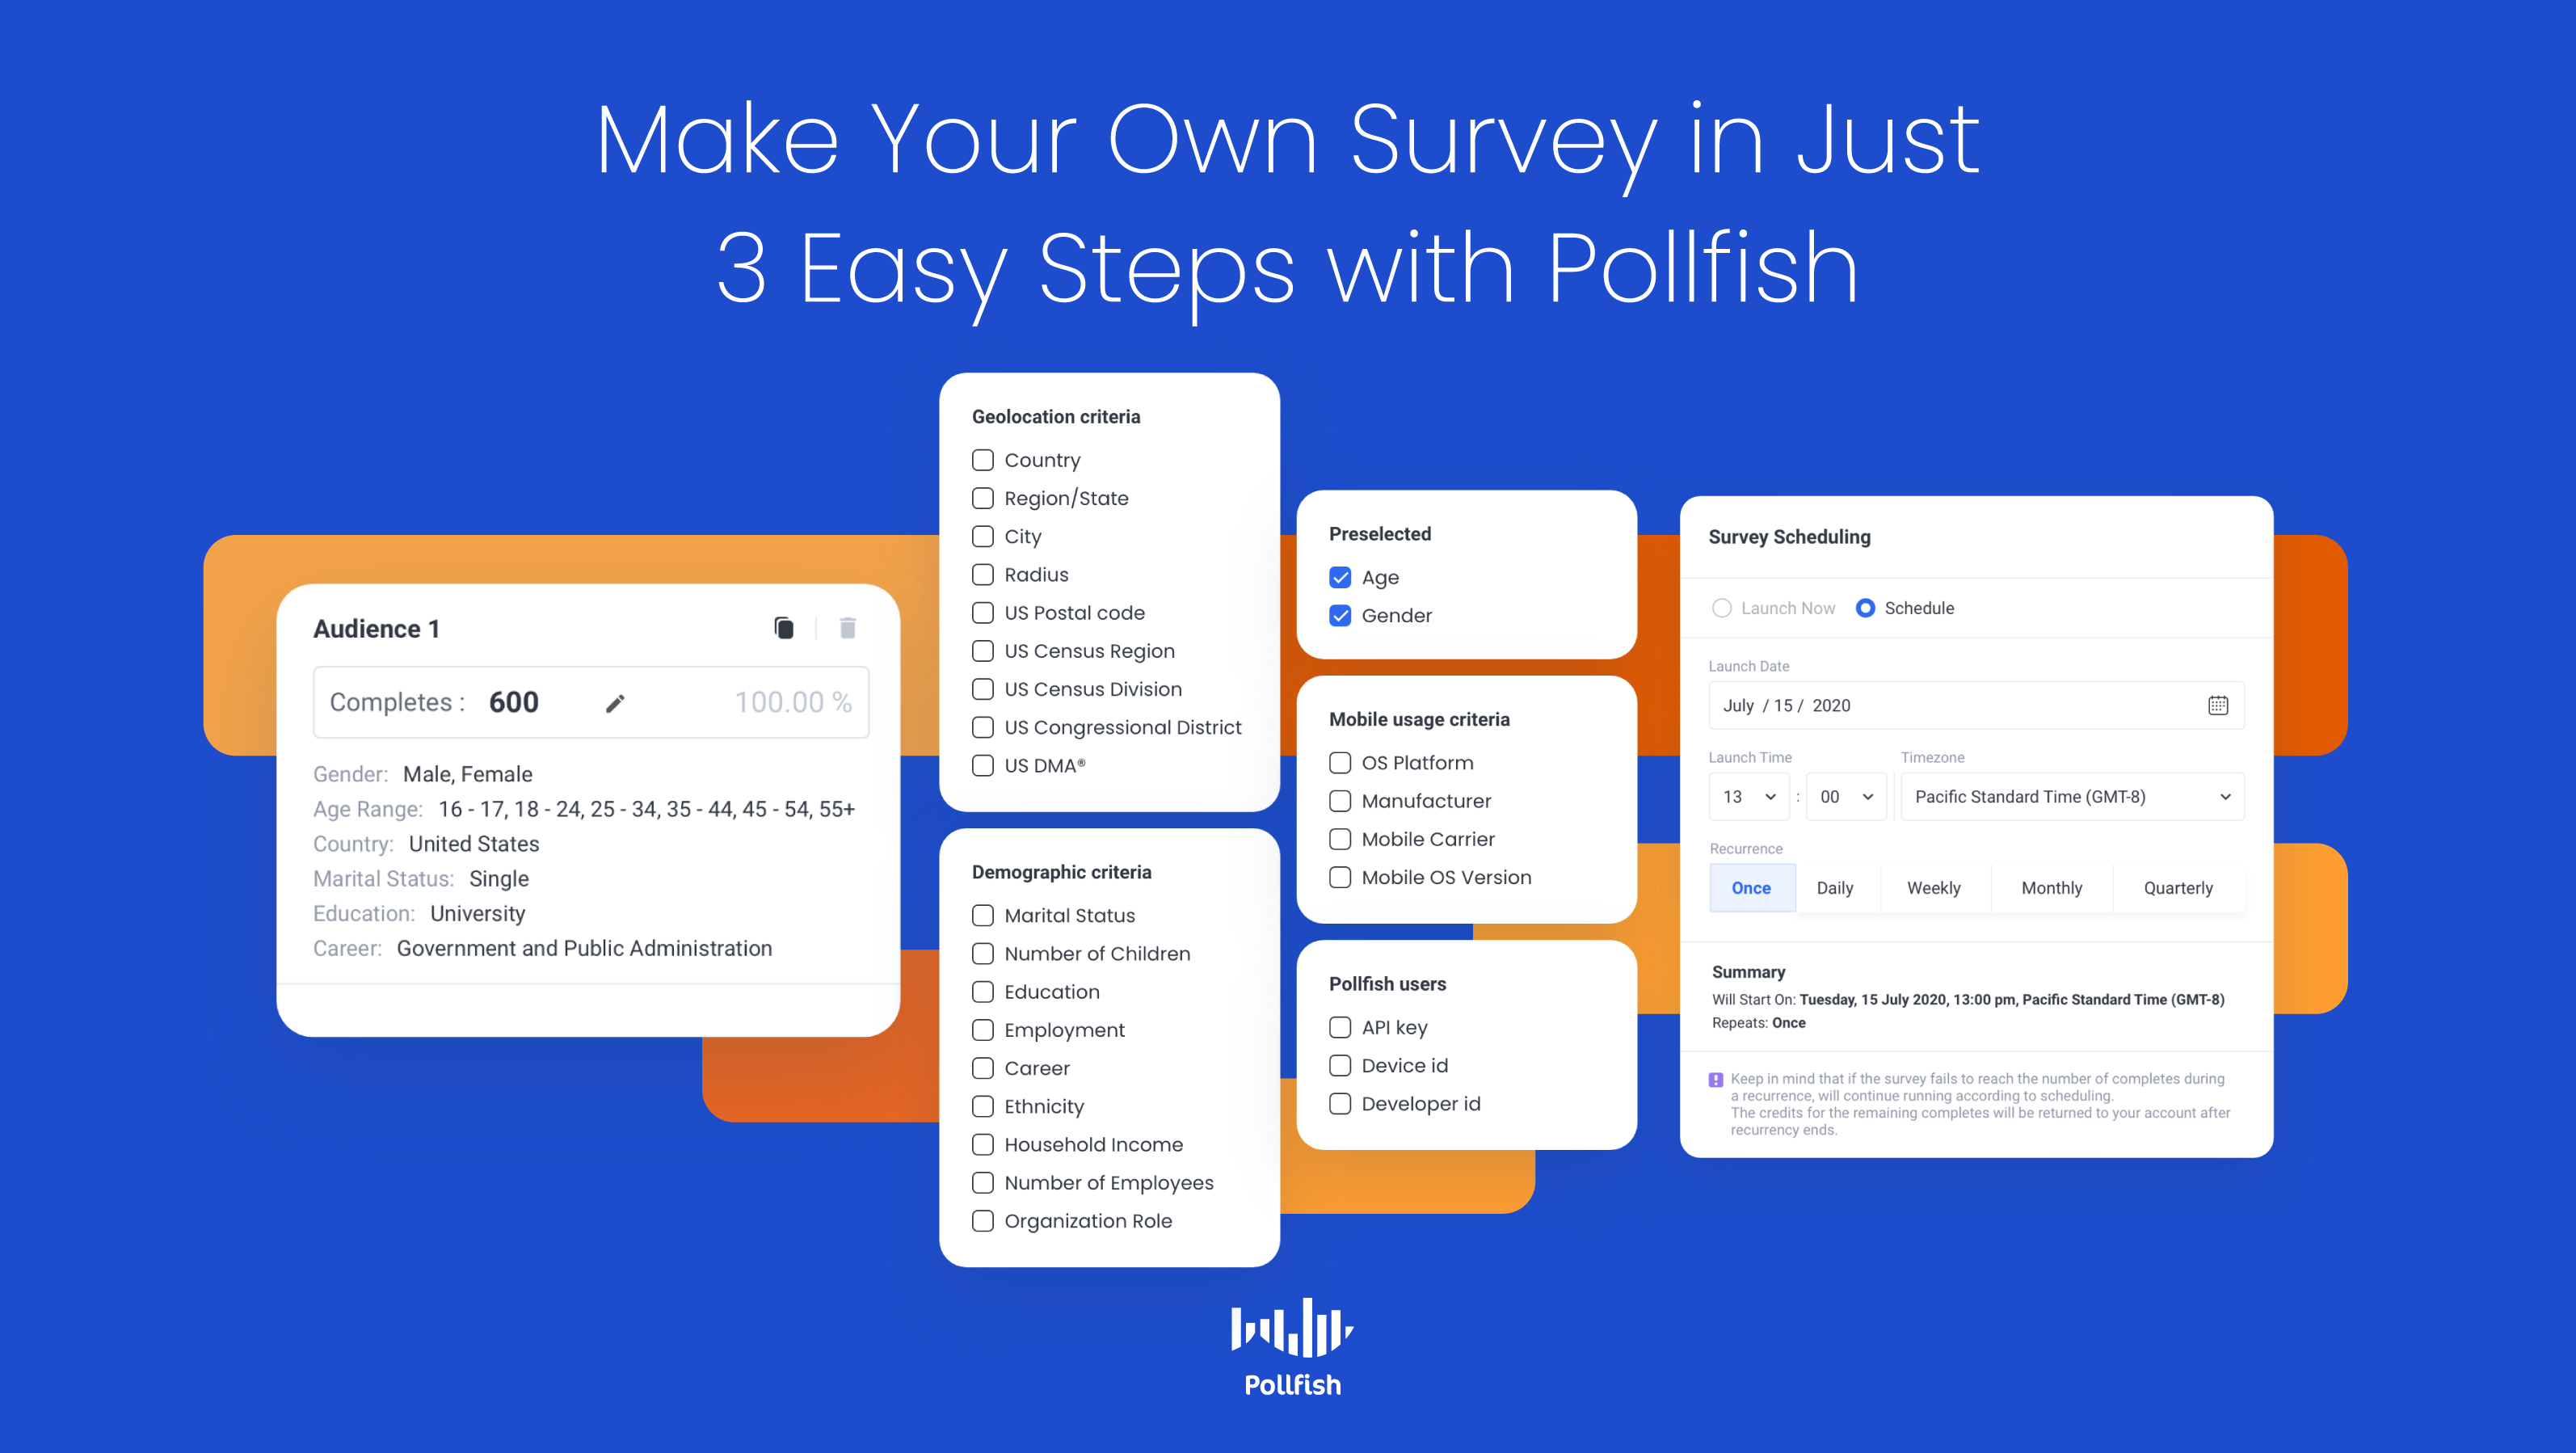
Step 1: Enter all your audience qualifications
The specifics of the audience enable you to dictate the kind of respondents to take your survey. These specifications certify that the respondents who answer the survey qualify to take it.
The audience section is twofold: it features the demographics section and the screener. The demographics section features various demographic categories. You should tick off all the boxes of categories and subcategories that you would like to study in the survey.
These categories include everything from geolocation — from country to postal code — to employment type, marital status and many other demographic categories. You can assign quotas to each category and subcategory. Or you can set each subcategory to receive an equivalent number of responses.

If this wasn’t granular enough, the screener portion allows you to ratchet up your audience requirements even further. For example, you can ask behavioral questions, such as: how many times a year do you go shopping on [vertical] sites?
Or you can ask more hyper-targeted demographics questions, such as: how many children do you have? This allows you to choose the answer(s) that allow the respondents to take the survey.
You can also place preset quotas on the screening questions.
Pollfish offers the addition of multiple audiences for your screener. This way, you can create separate audiences in one survey and achieve any targeting combination you desire. It expands the number of quotas you can employ per survey. Essentially, it allows you to widen your audience in one survey, eliminating the need to create several.
After you’ve applied all of your audience qualifications in the demographics section and the screener, it’s time to move to Step 2.
Step 2: Establish all the questionnaire content
The questionnaire stage is the heart of the survey. This stage allows you to add all the questions that you would like qualified participants to answer. It is the content of this step that will grant you market research data.
The survey platform you choose should allow you to choose from a variety of question types to add to your questionnaire. These are important as they control the type of survey you can create. 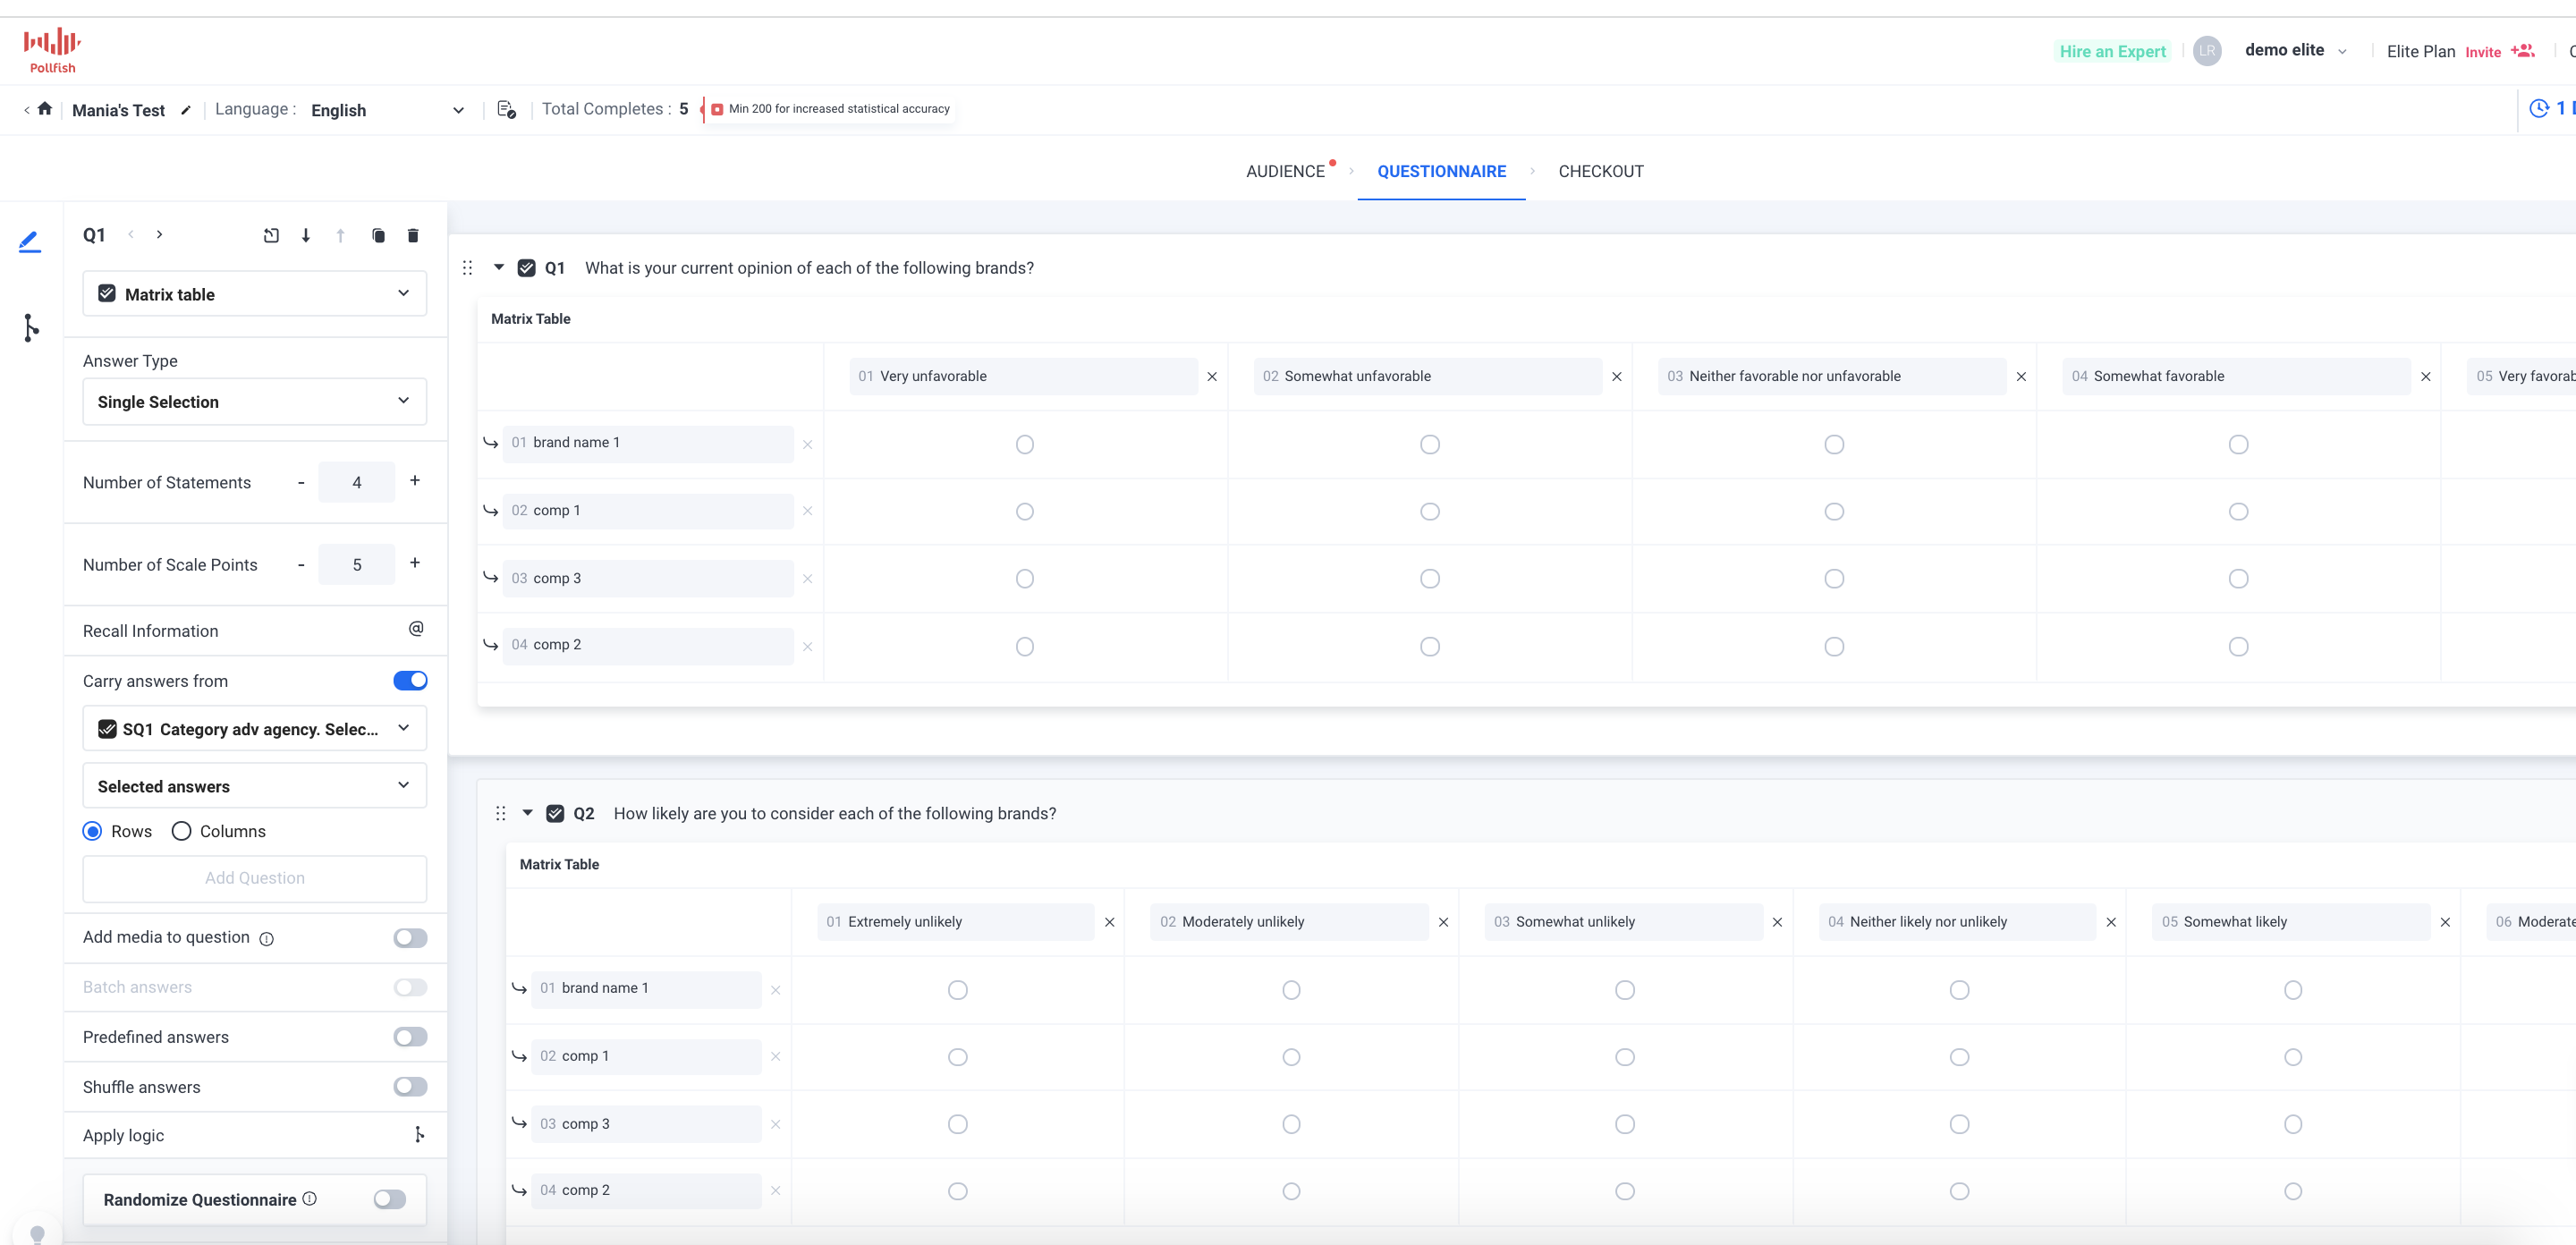
For example, in some surveys, such as Net Promoter Score surveys, you’ll need to include a numeric scale, as it is the basis for NPS surveys. In Visual Ratings surveys, emojis are required as part of the answer options.
The following lists some of the question types crucial to have in your online survey tool:
- Single selection
- Multiple-selection
- Open-ended
- Numeric open-ended
- Rating stars
- Likert scale
- Matrix questions
The question types should allow for multiple functionalities, such as:
- Adding media files to questions (images, GIFs, videos, etc.)
- Shuffling answers
- Using batch or predefined answers
- Adding “none of the above”
- Applying logic so users can go on custom question paths depending on their answers
You should be able to regroup questions and answers at the click of a button or two for a flexible survey research experience. This section should also allow you to add in the exact size of your sampling pool, i.e., the total number of respondents.
Additionally, this stage of the survey-making process should provide you with an estimated survey completion time, so that you will have a sense of how long it will take you to yield the number of responses that you preset.
Review all of your questions, answers, question paths and any other elements you have applied to your questionnaire. Make sure you’re not missing any questions you feel would be pertinent to your survey study.
Also, keep an eye out for spelling and grammar — these are going to go live as they appear on your dashboard. If you’re satisfied with it, then move on to Step 3.
Step 3: Set off the Survey Launch at the Check Out
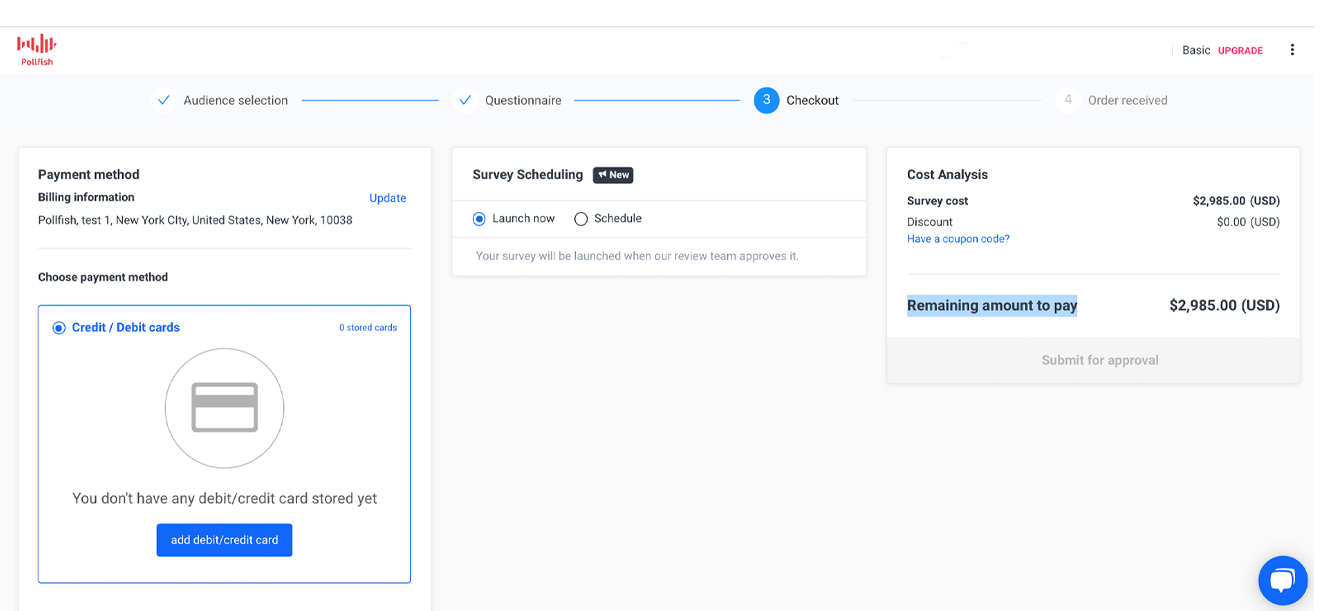
The final step of the survey-making process is essentially the simplest one, as it doesn’t require ideating or tweaking any in-survey content. Instead, all it requires is to fill in 3 quick requirements and your survey is almost as good as live.
Here are the requirements in 3 small sections making up this final step:
- Enter your billing information, such as your address and credit or debit card number.
- Choose from 2 options on survey scheduling: either to launch your survey then and there or to schedule it.
- Review your payment information in the Cost Analysis; here you can add a discount code if you have one.
- After you’ve reviewed the survey cost, hit the big button that reads “Submit for approval” and your survey is about to go live into the vast ecosystem of partner websites and apps that will deploy it.
Some online survey platforms (like the Pollfish one) will include a review stage from experts before your survey officially launches. This will ensure all your content is set up to run smoothly, with no glitches, eros, or logical issues.
There you have it; that’s all you need to do to make your survey and have it distributed to the masses.
Please note that this process is not universal to online survey tools; rather it is used in the Pollfish platform and meant to illustrate how convenient survey software programs can be when it comes to helping you make your survey.

Reaping the Most out of Your Online Survey Tool
Online survey tools are exceedingly important for market research, however, there’s more to them than just survey campaigns.
Your business ought to use secondary sources and perhaps other primary sources to bolster your survey research. This will ensure you are conducting a holistic market research campaign.
Keep in mind that while the survey-building process delineated in this article may seem simple, all survey tools are not the same. Some will demand a much more intricate process to create your survey. Others may not even contain the function of distributing your survey.
As such, you should invest in an online survey platform that provides the most gainful survey research experience. You should opt for survey software that offers a wide range of capabilities and functions (such as the ones mentioned in this article), along with the kind that makes it easy to configure your survey and launch it.
Frequently asked questions
What are some benefits of using survey software to make your own survey?
Survey software offers many benefits to those who wish to make their own surveys. Creating surveys in this way is cost-effective, versatile, flexible, easy to use, allows for easy data analysis, provides a simple way to control respondents, allows for a variety of applications and can be administered from anywhere.
Which three steps are required to make your own survey?
In general, this simple process can be followed: 1) target your audience by defining demographics and screener questions; 2) create the survey questionnaire; 3) launch your survey.
Why is it important to define your survey audience?
In order to ensure high-quality data, you want only qualified respondents to complete your survey. By establishing the correct demographics and presetting the screener to permit only the respondents that answered in a specific way, you are set to receive the respondents that belong to your target population only.
What types of responses do survey platforms typically offer?
A good survey platform will offer a variety of question responses including single-selection, multiple-choice, text entry field, numeric, scaled and visual rating systems.
What other features should you look for when choosing a survey platform to make your own survey?
Advanced features allow you to create better questions and can result in higher quality data. The types of features you should look for include the ability to add media to questions, random shuffling of survey responses, provision of predefined answers to simplify the question writing process and skip logic.