
New Demographic and Targeting Criteria on Pollfish
New Demographic and Targeting Criteria on Pollfish
We're constantly innovating our market research platform to equip you with strong survey research methods and the best survey experience for your respondents.
The first step to creating a survey in Pollfish is selecting your target audience. However, choosing a target audience can be a challenge if you’re unsure which segments are available or how to get started.

To ensure you’re reaching the right respondents, we’ve provided a full list of all the ways you can segment and select your target audience.
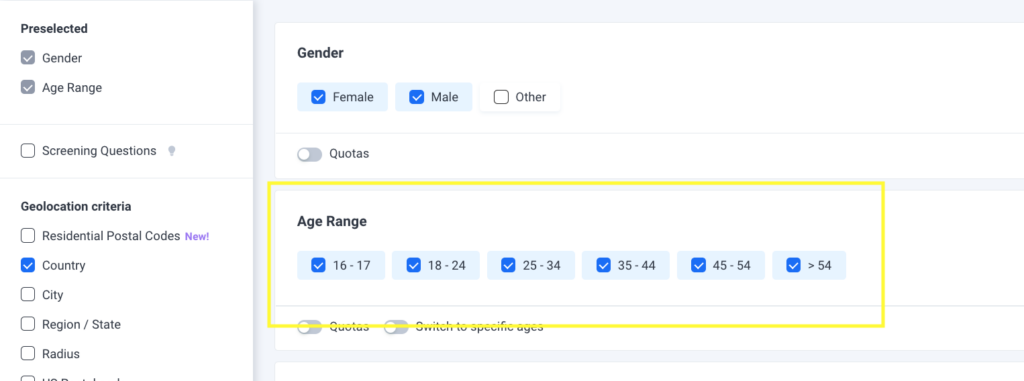
Targeting by Gender
- Male
- Female
- Gender Quotas
- Other
We've updated the Gender targeting filter on the Audience page. The Gender filter now includes a new choice — "Other'' — a non-binary gender option.
The option will not be preselected. if the researcher enables it. It has no additional cost, much like the 16-17 age range. Thus, the maximum price of the gender filter is also not affected. If your results include respondents identifying themselves as ''Other,'' post-stratification will not be available on the results page
The researchers can select the ''Other'' option along with making quotas in the gender filter.
Targeting by Age Range
- Six preset age groups (16-17, 18-24, 25-34, 35-44, 45-44, 54+)
- Specific Age groups (Min/Max)
- Age Group Quotas
Your survey begins with age and gender targeting included.
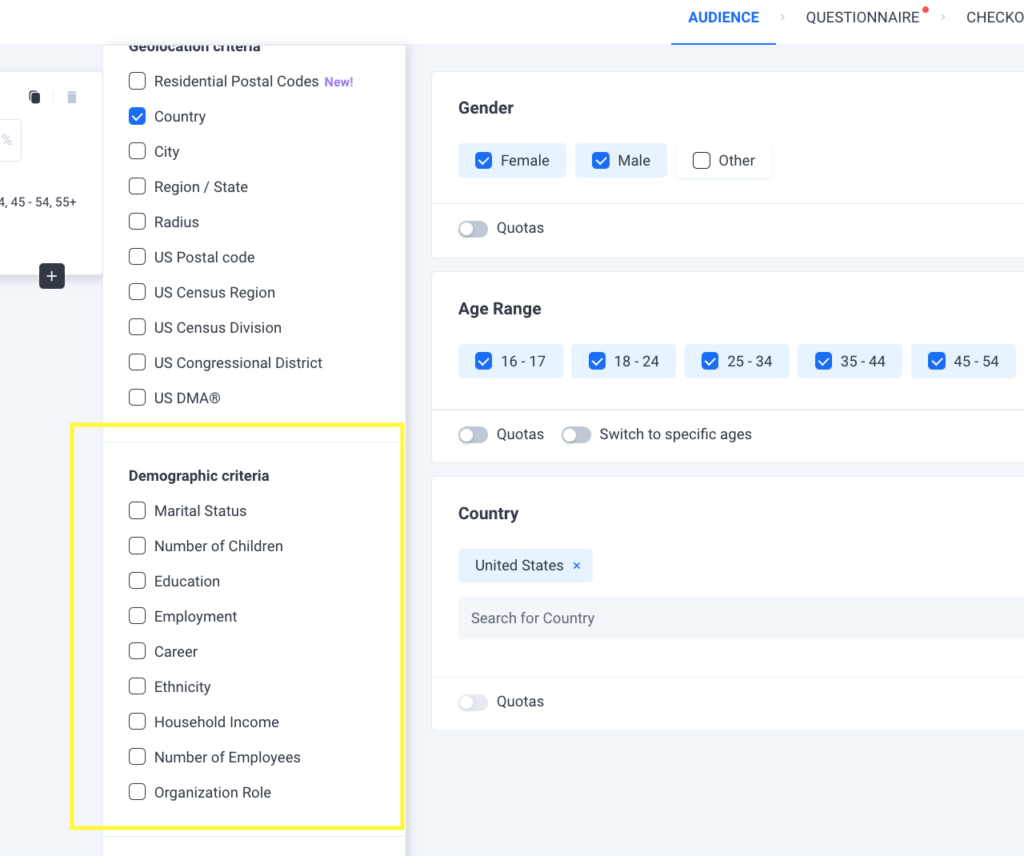
Targeting by Geolocation
- Country (over 160 countries available)
- City
- Region/ State
- Radius (from physical location)
- Residential Postal Code
- US Postal Code*
- US Census Region*
- US Census Division*
- US Congressional District*
- US DMA*
*Available in United States only
Residential Postal Code
This filter will be based on the data you collect through our demographic portion of the survey (at the demographic info collection section in the screener). Hence, the respondents will declare their location in response to the demographic question of ''What is your zip code?'' since the filter will be global originally.
In addition, we allow researchers to target either by residential postal codes only or by the other geolocation criteria available on the Audience page. This includes targeting by respondents based on their country, city, radius, zip code, etc.
You can contact Pollfish to enable Residential Postal codes on your account.
Targeting by Demographic Criteria
Pollfish asks each respondent to complete a profile in advance of taking their survey and uses rolling profiling to ensure that answers are up-to-date. Targeting can be used to reach people meeting any of the following criteria.
Marital Status:
- Single
- Married
- Divorced
- Living with Partner
- Separated
- Widowed
- Prefer not to say
Number of Children:
- None
- One
- Two
- Three
- Four
- Five
- Six or more
- Prefer not to say
Education:
- Middle School
- High School
- Vocational/ Technical College
- University
- Post-Graduate
Employment:
- Employed for wages
- Self-employed
- Unemployed and looking for work
- Unemployed but not currently looking
- Homemaker
- Student
- Military
- Retired
- Unable to Work
- Other
Career:
- Agriculture Forestry Fishing or Hunting
- Arts and Entertainment or Recreation
- Broadcasting
- Construction
- Education
- Finance and Insurance
- Government and Public Administration
- Health and Social Assistance
- Homemaker
- Hotel and Food Services
- Information—Other
- Information—Services and Data
- Legal Services
- Manufacturing—Computer and Electronics
- Manufacturing—Other
- Military
- Hotel and Food Services
- Processing
- Publishing
- Real Estate, Rental, or Leasing
- Religious
- Retail
- Scientific or Technical Services
- Software
- Telecommunications
- Transportation and Warehousing
- Energy/ Utilities/ Oil and Gas
- Wholesale
- Advertising
- Automotive
- Consulting
- Fashion/ Apparel
- Human Resources
- Market Research
- Marketing/ Sales
- Shipping/ Distribution
- Personal Services
- Security
- Other
Race/ Ethnicity:
- Arab
- Asian
- Black
- White
- Hispanic
- Latino
- Multiracial
- Other
- Prefer not to Say
Household Income:
- Lower I
- Lower II
- Middle I
- Middle II
- High I
- High II
- High III
- Prefer Not To Say
Household income mapping varies by country. To see how this breaks down, see the full list under household income criteria by country.
Number of Employees
- One
- 2-5
- 6-10
- 11-25
- 26-50
- 51-100
- 101-250
- 251-500
- 501-1000
- 1001-5000
- 5000+
- I don’t work
- Prefer not to say
Organization Role
- Owner or Partner
- President/ CEO/ Chairperson
- C-Level Executive
- Middle Management
- Chief Financial Officer (CFO)
- Chief Technical Officer (CTO)
- Senior Management
- Director
- HR Manager
- Supply Manager
- Project Management
- Business Administrator
- Supervisor
- Administrative/ Clerical
- Craftsman
- Foreman
- Technical Staff
- Sales Staff
- Buyer/ Purchasing Staff
- Other non-management staff
- Prefer not to say
Targeting by Mobile Device Criteria
OS Platform
- Android
- iOS
- Web
- Windows Phone
Manufacturer
- Acer
- Apple
- Blackberry
- Carrefour
- Samsung
- ..and more. (Due to our rapidly refreshing audience, it’s best to type the name of the manufacturer you are looking for into the dropdown search for the most up-to-date list of who we support)
Mobile Carrier
- AT&T
- B-Mobile (BT)
- Bell
- China Mobile
- T-Mobile
- Telstra
- Tesco
- Softbank
- Sprint
- Verizon
- Vodafone
- ..and more. (Due to our rapidly refreshing audience, it’s best to type the mobile carrier you are looking for into the dropdown search for the most up-to-date list of who we support)
Pollfish offers 3 screening questions to help you define your audience even further. You can also use these to narrow in on specific behaviors, beliefs, or motivations of your target audience. Be sure to check out our post on how to use screening questions effectively to get the most out of them.
Once you have selected your targeting criteria, you’ll see a preview of your audience makeup on the right side of your dashboard, along with an estimated time to completion. Review how to set up targeting with our video to get started.
https://vimeo.com/304695551

What is a MaxDiff Analysis? The New Best-Worst Scaling Feature
What is a MaxDiff Analysis? The New Best-Worst Scaling Feature

How to Benefit from Pollfish A/B Test Results & Exports
How to Benefit from Pollfish A/B Test Results & Exports
There are various ways researchers can benefit from Pollfish A/B test results and exports, as the Pollfish platform supports different A/B testing capabilities. These include both monadic A/B testing and sequential A/B testing.
At Pollfish, we’re thrilled to offer product features that exist outside the span of surveys alone, allowing our platform to deliver a truly all-encompassing market research experience. As you know, there are all kinds of market research techniques, which include both primary and secondary market research.
You can form primary market research campaigns via surveying your target market, or by creating A/B tests on any topic of your choice, whether it is for an ad campaign or product development.
It is therefore no surprise that 77% of companies use A/B testing on their website and 71% of companies do so monthly.
This article explains how to use and benefit from A/B testing results and exports on the Pollfish platform.
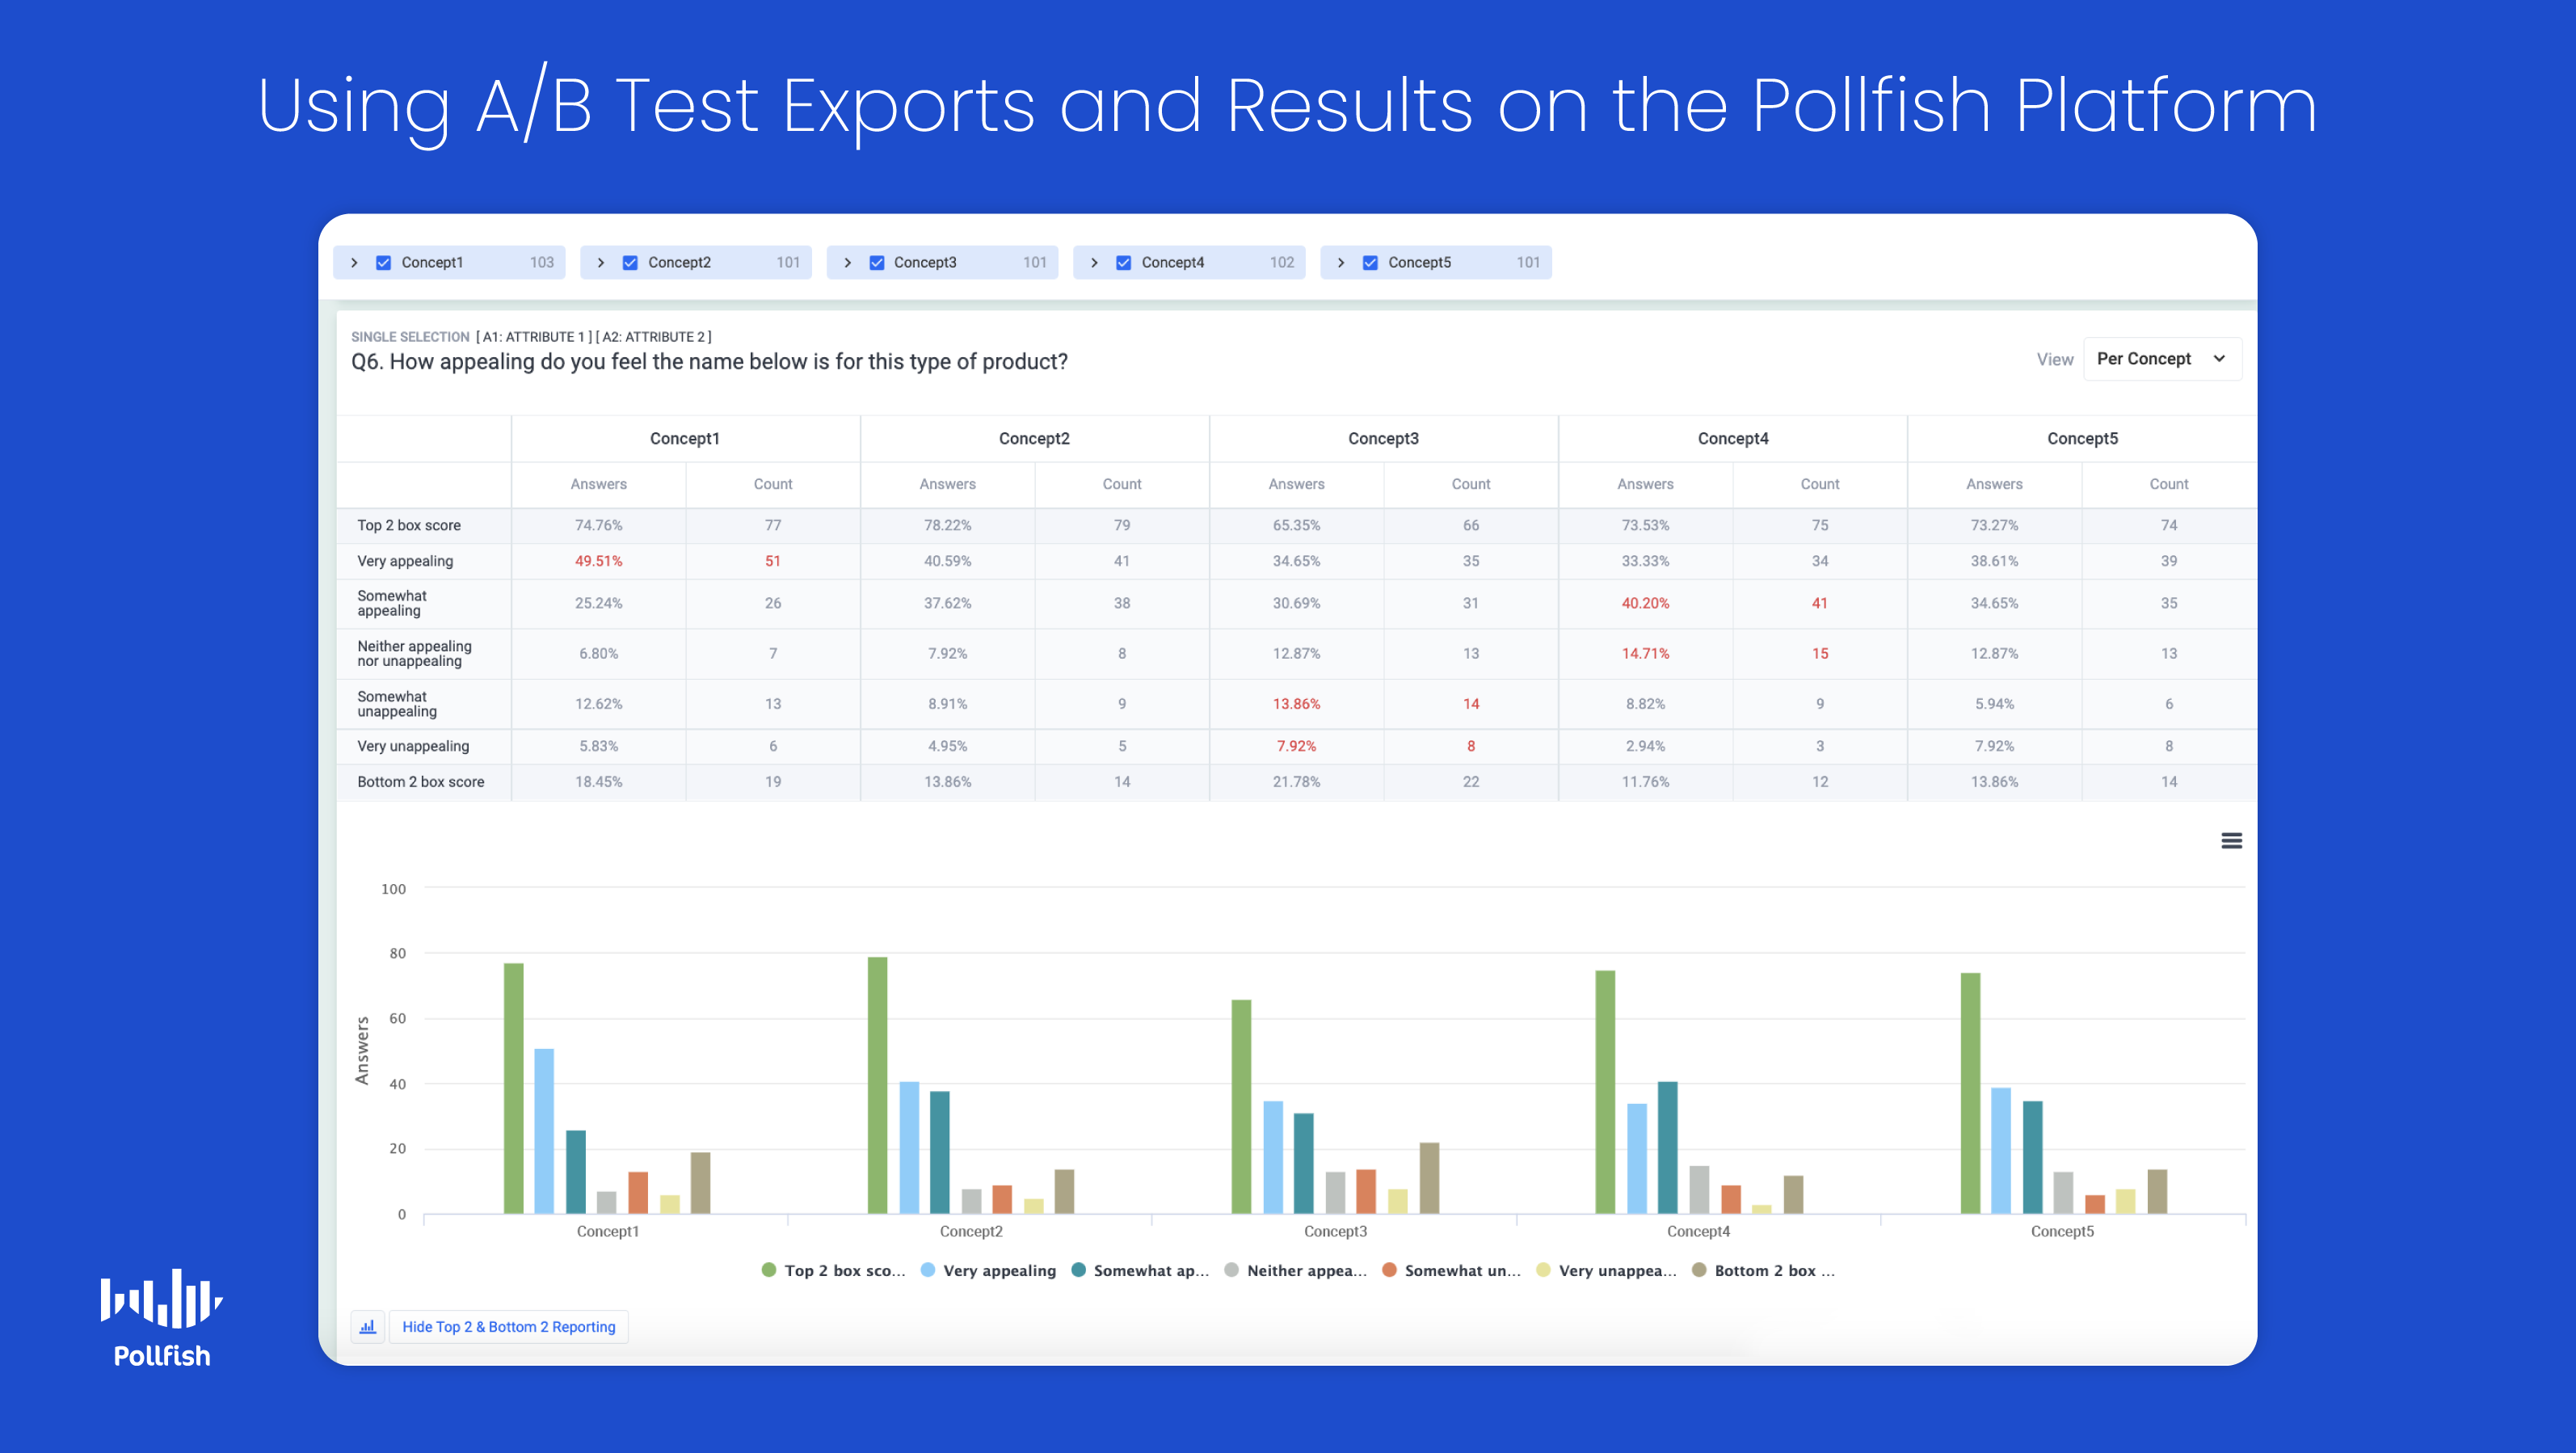
A/B Testing Results Dashboard
Both the Monadic and Sequential A/B testing results are displayed in separate blocks in the Pollfish dashboard. There, researchers can preview the contents of each A/B testing campaign.
You can use concept shortcuts to filter the results page, isolating the concepts’ audience, along with the question information you seek. While navigating down the questions included in the A/B test, the concept shortcuts remain sticky so that you can access their content easily.
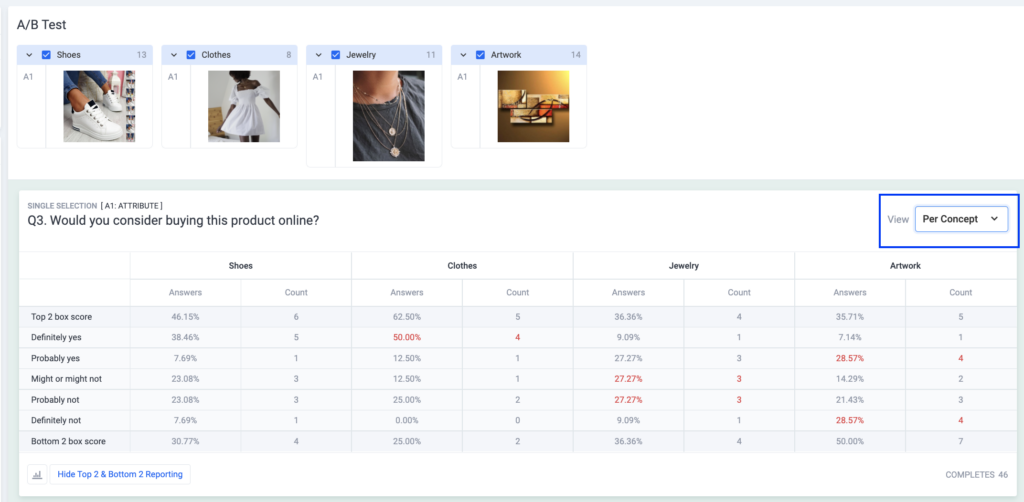
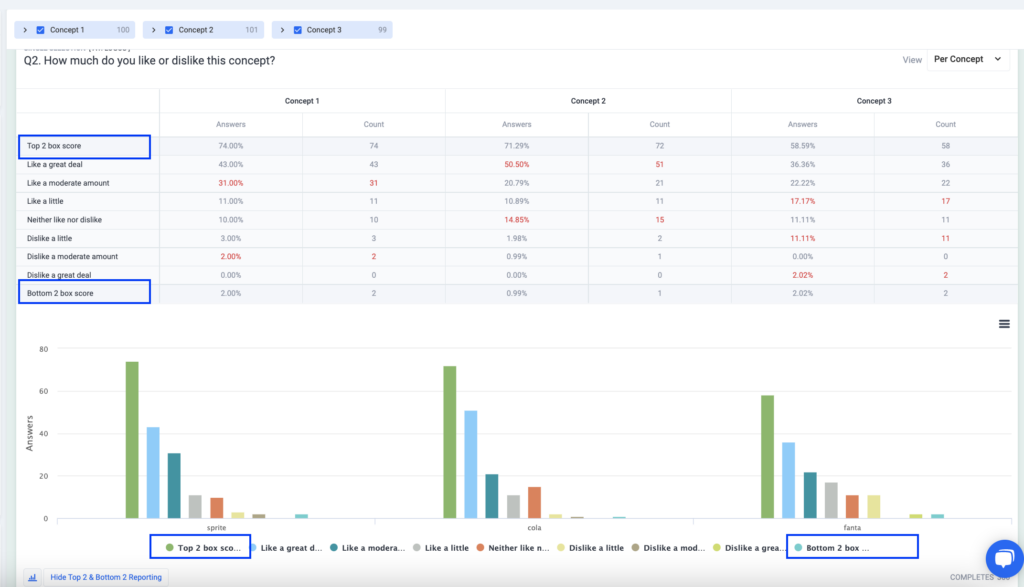
Each question included in a Monadic or Sequential A/B test is presented with concept attributes that accompany the question. You can switch the view of the question results, between concept-focused or answer-focused tables, wherever applicable.
To assist you in simplifying the results of Likert scale questions, our report comes from the Top 2 Box score and Bottom 2 Box scores, which are at the Single selection and Matrix Single selection questions. These are in both the tables and the charts.
The Top 2 Box score is the sum of the number of responses that originate from the first two answers, whereas the Bottom 2 Box score is the sum of the number of responses that are derived from the last 2 answers.
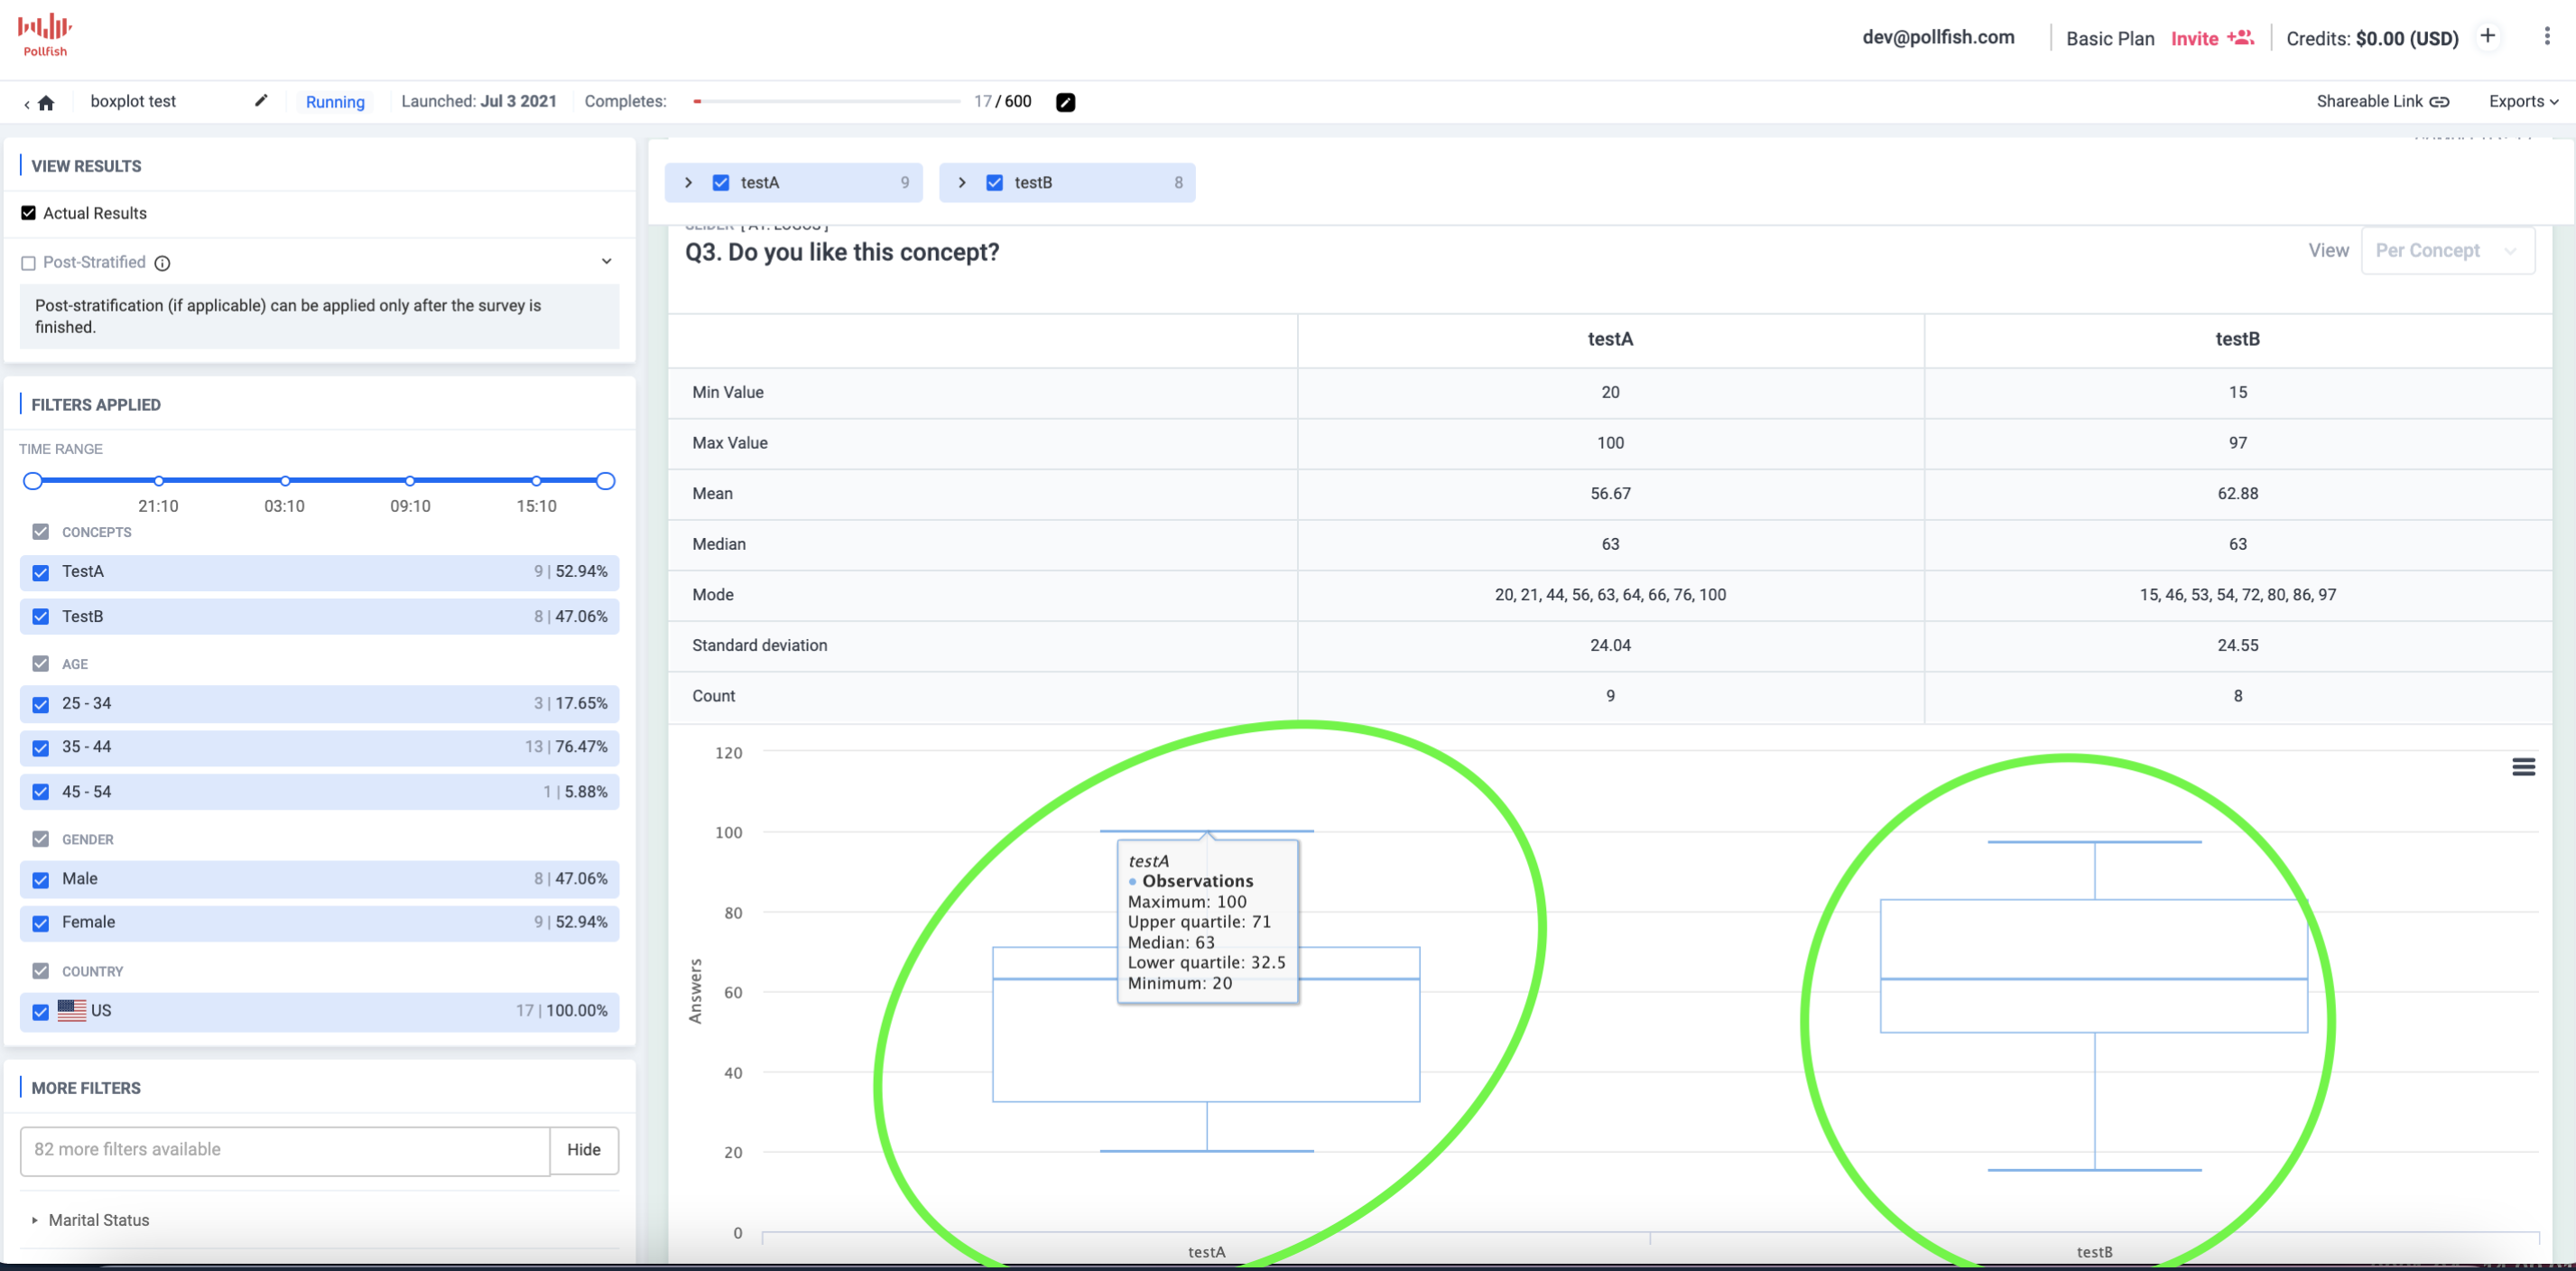
Slider and numeric open-ended questions are presented with a box plot diagram, per concept.
A boxplot is a standardized way of displaying the distribution of data based on a five-number summary (“minimum”, first quartile (Q1), median, third quartile (Q3), and “maximum”). It shows you about your outliers and what their values are.
It can also reveal if your data is symmetrical, how tightly your data is grouped, along with if and how your data is skewed.

A/B Testing Exports
All A/B test exports come through with concepts’ information.
Concept information is included in the form of PDF, Excel, CSV and SPSS exports. In the near future, Pollfish will include concepts in an export of Crosstabs.
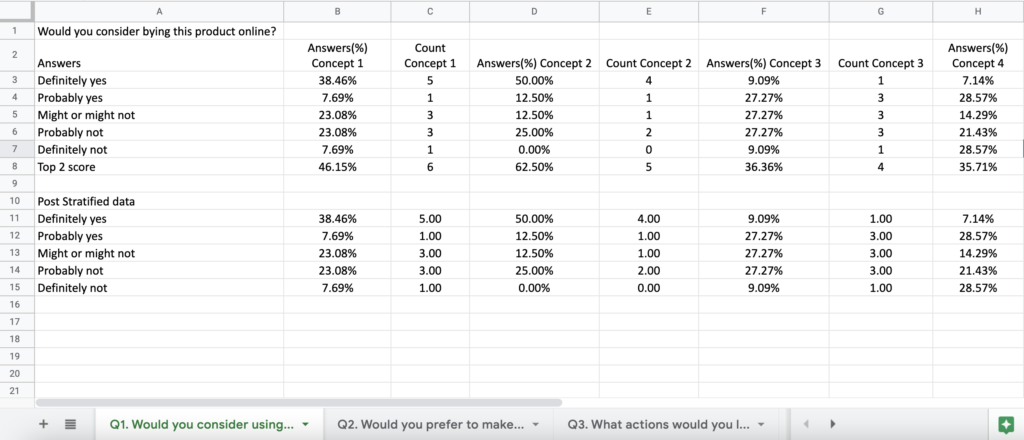
Recently, Pollfish has added a new type of Excel export, the Comparison export, in which you can view and compare statistics on different questions for all the concepts side by side. This file is available once the A/B test gets completed, and is offered with post stratified data if applicable.
The Top 2 Box score is also available in the exports section for Single and Matrix Single selection questions.
If you have an Elite plan and use a BQ integration, you will receive the concepts’ information for each response, from the data you export.
Driving the Best A/B Testing Campaigns
A/B testing campaigns help drive the success of all kinds of business campaigns, whether they are product, ad, or topically focused. In order to reap the benefits of A/B tests, you’ll need a platform that offers optimal A/B test exports and results.
You’ll also need to refer to other considerations when choosing a strong online market research platform. These include selecting a top-tier mobile-first platform, as the mobile space continues to dominate and no one wants to participate in research campaigns on a poorly constructed mobile environment.
Your market research platform should also offer artificial intelligence and machine learning to disqualify low-quality data and offer a broad range of survey and question types.
Additionally, it should also allow you to reach anyone. As such, you’ll need a platform with a reach to millions of consumers, along with one that offers the Distribution Link feature. This feature will allow you to send your survey to specific consumers, instead of solely deploying them across a vast network.
With a market research platform that offers all of these offerings, you’ll be able to continuously measure and improve on a wide variety of business campaigns, including sales and marketing and beyond.

How to Analyze the Conjoint Analysis Feature on the Pollfish Platform
How to Analyze the Conjoint Analysis Feature on the Pollfish Platform

We covered the critical question of what is conjoint analysis, explaining its utility, especially in the product development and customer development space. A previous article has also discussed how to build a Conjoint Analysis survey on the Pollfsh online survey platform.
With those insights in mind, it’s crucial to learn how to analyze the Conjoint Analysis feature, which is choice-based on the Polfish platform. You can do so by familiarizing yourself with its different data visualizations, which adequately provide data for decision making.
This article expounds on how to analyze a conjoint analysis feature on the Pollfish market research platform.
Generating Insights from the Conjoint Analysis in Your Dashboard
You can easily generate the insights you’ll need to understand your conjoint analysis in the Pollfish dashboard. To access this feature, simply visit your survey results page and remain on the Conjoint Analysis block. No visualizations will appear until you have collected four responses.
In the Conjoint Analysis block, you will see three graphs: the Attribute importance chart, the Level Utilities chart and the Distribution of Level Preferences chart and a Ranked list of product alternatives as preferred by customers.
Check out this preview of the results page:
https://www.loom.com/share/745f0240ef1c4b879c6e9bc5db6db3a7
The Attribute Relative Importance Graph
This graph displays the influence an attribute has when the respondent selects their preferred alternative. The higher the percentage, the more influential it is in the decision-making process of the potential consumers.
Assuming a survey with 3 attributes tested and None of the above options enabled, the Brand is the most influential attribute relative to the Colour and Price which is the least influential attribute (as displayed below).
This chart shows how strongly the variations of attributes affect customers' choice, but only for the levels that you chose in the design.

Level Utilities
This allows you to dive deeper to understand what specific levels within an attribute drive customers' choice. Each graph displays the measurement of preference for the levels of an attribute. Level utilities are calculated based on the average preference scores for each level. The higher the percentage, the higher the influence of the level at the customer's decision to select a product alternative.


Distribution of Level Preferences Graph
This visualization displays the measurement of the probability that a level would be selected over another, if all other attributes were held constant. The higher the percentage a level has, the higher it was preferred within the levels of the attribute by respondents.

Willingness to pay
Willingness to pay is the maximum price a customer is willing to pay for a product or service (ie. how much users are ready to pay for an upgrade from level A to level B, in addition to the price they are already paying now).
Each attribute has its own chart, where values represent monetary values. By using the chart and selecting a different baseline level, you can compare how much respondents are willing to pay for an upgrade or a downgrade to another level.
Willingness to pay is a chart available only for Conjoint surveys containing an attribute of Price type.
In the example below, the baseline level for “Perfume” attribute is set to “Floral”. From the graph, we can understand that users are willing to pay $2.05 more for “Lavender”, whereas for the “Green Citrus” they are willing to pay $0.77 less than for “Floral”.

You can change the baseline level for the specific attribute to “Ocean” to compare how this performs against the other levels, by clicking on the relevant bar. This will convert “Ocean” to the baseline level, where we can see that users are willing to pay more only for the “Free of perfume”, whereas for all other levels of “Perfume” they are willing to pay less than they would for “Floral”.

Ranked List of Product Alternatives
This table displays how the product alternatives are ranked, based on the level utilities. The first ones are the most preferred among the respondents.

You can apply the results of the Conjoint Analysis feature through filters. Just use the filters with the selected demographic criteria and to the rest of the demographics gathered.
The information in the graphs gets recalculated to provide insights only for the filtered audience, as long as there are at least four remaining responses. Post-stratification is not available on the Conjoint Analysis feature.


How to Build a Conjoint Analysis Survey on the Pollfish Platform
How to Build a Conjoint Analysis Survey on the Pollfish Platform

We explained what is Conjoint Analysis in a recent article, which includes the purpose of such an analysis, how it exists in the Pollfish platform, its importance in market research, particularly in product development and more.
In the Pollfish online survey platform, we offer a choice-based conjoint analysis, which works differently than ranking and rating items. Instead, the choice-based version asks respondents specifically if they would buy a certain product or not.
As such, this version shows survey respondents a series of options and asks them to select the one they are most likely to purchase or use.
The respondent will see alternatives included in choice sets that are repeated. Let’s learn how to use the Conjoint Analysis tool on Pollfish
This article guides you through the process of building a conjoint analysis on the Pollfish platform.
How to Build a Regular Conjoint Analysis Survey
Follow the instructions below to easily access and utilize this new feature.
- Open the Pollfish dashboard and hit “Create a new survey.”
- Add the conjoint method to your survey.
- At the question types option at the panel, there is a new method called Conjoint. Select it.


- At the question types option at the panel, there is a new method called Conjoint. Select it.
- Add the instructions.
- At the block displayed, provide instructions for the respondent on how to respond to the question text. Conjoint is presented as a repeated single selection question with different sets of product alternatives each time, so that the respondent selects one of them.


- At the block displayed, provide instructions for the respondent on how to respond to the question text. Conjoint is presented as a repeated single selection question with different sets of product alternatives each time, so that the respondent selects one of them.
- Add attributes and levels.
- Attributes are the different characteristics that a product comprises, such as the shape, type, quantity, etc.
- Attributes can be categorized as Features by default. If you need to specify price attributes, use the Price type, so that the analysis includes the Willingness to Pay graph. When using a Price type attribute, we suggest the following: none of the levels of price is zero and if there are more than two levels, they should have approximately equal gaps between them.
- Levels are the values that each attribute can take. For example, the perfume attribute can have levels of floral, green citrus, lavender, etc. Product alternatives are constructed from level combinations of each attribute included in the Conjoint Analysis feature.


- You can add the price levels formatted with a currency symbol or text that is displayed at the Conjoint question, while the plain numbers displayed at the “Just the number” fields will be used for the analysis.

- Heed the following restrictions and advice on attributes and levels.
- A conjoint experiment should have at least 2 attributes.
- Each attribute should have at least 2 levels.
- Use a maximum of 6-7 attributes. We recommend displaying no more than these in your conjoint question; any more and respondents will have difficulty in weighing the different options available.
- It is suggested that when using a Price attribute, the levels are linear so that Marginal Willingness to Pay is not biased.
- Prohibit particular level pairs.
- By default, all attribute levels have an equal likelihood of displaying together. This means that some product alternatives that will display in the conjoint question are not realistic. For example, sometimes a product will be shown with all the best features and at the lowest price.
- In order to prohibit such alternatives, you can use the “exclude combinations” setting. We advise prohibited pairs to be no more than 4.

- Enable none of the above.
- By default, the “none of the above” option is disabled.
- However, if you select to enable this option, this is visible on mobile every time a respondent views a choice set of alternatives (as a last choice under the alternatives).

- Access the preview.
- In order to preview a survey that contains a Conjoint question, you should click on the “Generate preview” button at the questionnaire tab while editing your Conjoint.
- By clicking the “Generate preview” button, your Conjoint attributes and levels are used to “feed” the Conjoint Design of Experiments algorithm and you will preview the actual Conjoint question that respondents will get.
- In the case that the survey contains any other questions, these will be included in the survey preview flow.
- Additionally, the Total Cost gets updated, including Conjoint costs, the survey’s path length gets updated and the number of alternatives per choice set and a number of choice sets are displayed (as determined by the Conjoint Design of Experiments algorithm).
- Every time the number of attributes and levels changes, or excluded pairs are altered, you have to click on the “Generate preview” button, to preview the new Conjoint question and get informed about the cost.


- Set the alternatives that each choice set contains and the number of choices that the respondents view.
- After you use the Conjoint Design of experiments, you can view how many times the Conjoint questions/ choice sets will be repeated and how many alternatives each choice set contains, as determined by the Conjoint Design of Experiments algorithm. Conjoint algorithms automatically decide the number of choice sets that each respondent will see in order to guarantee that all alternatives are displayed the same number of times to respondents.
- Add additional content
- Once your Conjoint question is set up, you are free to edit the rest of the survey in the questionnaire tab. You can add questions or question groups before and after the conjoint analysis question, determining survey behavior via survey logic.
- Before the conjoint question, you can add consent questions and you can add follow-up questions after the Conjoint question, as you would at a regular survey.
- Checkout
- Once you've completed setting up the Conjoint Analysis feature and any other questions, you can check out the survey. After it gets reviewed and approved, it will be live to gather responses.
- Translate your Conjoint Analysis survey.
- You can translate your specified attributes and levels, so that you can view the analysis in the language of your preference. In addition, the translation of attributes and levels is applied to the exported data at the Excel, CSV, SPSS files and at BQ.
- You can translate your specified attributes and levels, so that you can view the analysis in the language of your preference. In addition, the translation of attributes and levels is applied to the exported data at the Excel, CSV, SPSS files and at BQ.

 How to Create a Survey Link with Conjoint Analysis in Pollfish
Researchers on the Pollfish platform can use the Conjoint Analysis feature by way of a survey link and share it with your audience.
They can also duplicate a survey link that contains the Conjoint Analysis to a regular survey using the Pollfish global survey network, or you can do the opposite, duplicating a regular one to a survey link to distribute it to your own audiences via social media, email and more.

The Pollfish Survey Process for Reviewing and Approving Surveys
The Pollfish Survey Process for Reviewing and Approving Surveys

The survey process at Pollfish involves a variety of factors and actions that ensure quality results from your deployed surveys.
As soon as a researcher hits “checkout” on the Pollfish online survey platform, their survey undergoes a process of survey review and approval before it launches.
This way, the researcher can rest assured that their survey is error-free and the questions make sense, should they choose to add survey logic or advanced skip logic. The last thing you would want is to have poorly structured surveys that confuse your target audience.
After a survey gets approved and is launched, it still undergoes a rigorous post-launch survey process using artificial intelligence, as the survey is being completed and responses are gathered.
This weeds out quality data and prevents survey fraud from the Pollfish network.
This article explains the survey process of reviewing and approving surveys before they get deployed on our massive publishers’ network.
How the Review and Approval Survey Process Works
After you reach the third (and final) section of the Pollfish online survey platform — the checkout action — you can check out your survey by hitting the “Submit for approval” button.
This begins the review and approval process, in which members of the Pollfish review team — examine your survey before launching it. Not all surveys will be launched upon review. Some surveys may require you to go back and fix an issue that the Review team had flagged.
If the team has any concerns with any aspect of a survey, they will communicate them in the form of comments. These comments can exist as an add-on to a question or its structure. Thus, you’ll see them in your survey after the Review team adds them.
Comments can be either mandatory or optional. When researchers receive both mandatory and optional comments, they must address both forms of comments, otherwise, their survey will not launch. With mandatory comments, you must edit your question according to the suggestion(s) in the comment.
With optional comments, although you do not have to follow their orders, you still ought to acknowledge them so that your survey can go live. To do so, you’ll need to click the accompanying “OK, got it” button.
Once you’ve responded to the comments, by either following their orders or clicking the acknowledgment button, the Review team will be notified and your survey will be under review once more.
From there on, the team can approve the survey and launch it immediately across our wide network of publishing partners. These include websites, apps and mobile sites.
Before the Review team approves a survey, researchers can withdraw it.
This process does not apply to the Distribution Link feature, in which researchers send surveys to specific individuals, rather than a large network of visitors of different digital properties.
Elite accounts can contact their account manager if they need extra tips or advice for the review process.
What Happens in the Review and Approval Survey Process
When the survey review process starts, the survey under review is locked, thus, no changes can be made to it by the researchers.
If the researcher wants to make any last-minute changes, they must contact the team to apply them. This can be done via the support chat or a phone call.

During the review and approval survey process, the Review team searches for errors that could cause the client's survey to not function properly. The goal of the team is to intervene with the survey design as little as possible, leaving the original design up to the use of the platform.
The review team suggests best practices based on our methodology, whenever they are applicable, along with checking for compliance with our policies.
The team will start flagging aspects of the survey by making mandatory comments (in which questions or aspects of the survey must be edited/changed). Optional comments offer suggestions to optimize the design of the platform to get the best possible outcome for your market research goals.
The review process can be completed in as quick as several minutes or take up to 2 hours. This is because there may be a lot of surveys in the pipeline. Elite surveys have a higher priority in the review queue.
Mandatory and Optional Comments
Not all surveys will receive comments, as the review team adds them to resolve errors. If there are no errors, the survey is launched immediately after the review.
When you have both types of comments in a single review — mandatory and optional, the survey goes back to draft status. Also, in the case of both, they go to a draft state, in which researchers need to edit and resubmit the survey.
Mandatory comments or both mandatory and optional comments render the survey to a draft state and researchers must apply the changes asked for in the comments.
In the previous cases, researchers will need to edit their survey again and resubmit it for review. After sending a survey back with mandatory comments, the survey goes back to the draft status — the draft tab in the dashboard.
As such, a survey with mandatory comments goes to a draft state, in which researchers need to edit and resubmit the survey.
Optional comments only grant the survey an approved state, but in the case of both mandatory and optional comments, researchers still must acknowledge the comments. After hitting “OK, got it” in optional comments, researchers can then launch their survey.
The comments can be seen within the questionnaire.
If the review consists of optional comments only, the researcher can proceed with two options. They can proceed with one of these two actions directly from the review email that they’ll have received.
The first optional action is to launch the survey directly, with no review process thereafter and without opening the questionnaire again.
To do so, you would need to click on the 3 dots next to the survey in the ''approved'' tab in their dashboard, then select “launch now.''
The second option is to edit the questionnaire if they seek to proceed with the optional suggestions and go through the review process again. To do so, you would need to click on the 3 dots next to the survey in the ''approved'' tab on the dashboard and select '’edit.''
If researchers don’t make any changes to mandatory comments, they’ll repeat the survey process, as the survey will be blocked. It will be blocked until all mandatory options are addressed by adding their respective changes.
For example:
If there are 10 mandatory comments, but the researcher only made changes to 2 of them, the survey will still be blocked and they’ll continue receiving emails to address the comments.
If the researcher resubmits the survey without making any changes, the process will repeat. They also have the option to contact the support team.
In short, optional comments get an approved state. Researchers can edit if they want and resubmit the survey, or launch it without resubmitting.
Pollfish could be flexible when it comes to specific mandatory comments. For example:
In a question that asks for the sentiments of respondents, typically, statements that are contradictory in multiple selection questions will be flagged. The team will make a comment for this kind of question to be changed to a single selection question.
However, if the purpose is to collect all sentiments of the respondents, due to their complexity, the researchers can ask for the mandatory status to be removed by either replying to the email (more on emails in the second section below) or by chatting/calling a support team member.
They can chat within the survey. Then, a review member will evaluate the request, and if it complies with our policies, they will disregard the comment.
How Surveys Are Rejected in the Process
The review team can reject the surveys for any reason in the system. If a survey is rejected (due to one or multiple comments that need to be either acknowledged or fixed), it will be sent back.
Aside from technical issues in the comments, which can relate to improper survey logic or any of the types of survey questions wrongly formed, surveys can also be rejected for the following reasons:
- Violating the terms of the survey
- Design issues
Unique Respondents Across Surveys
If researchers need to send them to different respondents, they must reach out via chat and tell the support team that they have two or more surveys and want to group them on the backend so they will get unique respondents. This must be done before submitting the survey at the checkout.
For example, they may have the same audience to see a campaign: highly educated people in the US, but need different individuals in the audience to see a certain campaign survey, and others to see a different survey.
Scheduled Surveys
When the team approves a survey that is scheduled, the survey gets an approved status. This means it goes to the approved tab until the launching date and time.
Researchers must acknowledge comments even if the survey is scheduled. If they don’t acknowledge the comments, the survey won’t launch.
To make changes or acknowledge the comments, you must edit the survey, and then checkout. Doing so will enact the required or optional change. By clicking on “submit,” the survey process for review and approval starts again.
Emails in the Survey Process
Emails play a major role in the survey process of review and approval, as they are the main communication tool between the review team and platform and the users of Pollfish.
Researchers will receive a series of emails. The first email is a confirmation that you submitted the survey for approval. Often, the second email relays that your survey requires action. This type of email will include notice of either mandatory or optional comments.
The optional email will be titled as such: “Our survey review team has recommendations only.”

The mandatory email will be titled as such: “ACTION REQUIRED: Please edit your survey [name of the survey] for it to start.” The body of both kinds of emails will inform you that your survey has recommendations. However, the mandatory one is marked as such in red in the body.
If you’ve made all the necessary changes to the mandatory comments and acknowledged all the optional ones, you will then resubmit the survey.

Issues in the Survey Process that Prompt Comments
The review team comes upon different issues during the survey review and approval process. As aforementioned, these issues hamper the launch of the survey and are up to the researcher to fix.
The previous section on how surveys are rejected gives a few key examples of issues that cause the team to block the survey and place comments for the researcher to address.
The following lists more key issues that prompt comments and temporary blocks to surveys:
- Personal Information
- Per the Pollfish terms and conditions, we do not allow questions collecting personally identifiable information and/or contact information (such as name, address, place of work, phone number, email address, etc.) to protect the respondents’ privacy and anonymity.
- We also do not allow researchers to share their own personal or contact information through the survey.
- Links/URLs in questions/answers
- We do not allow researchers to insert links within questions redirecting respondents outside the survey environment; per our methodology, a respondent's participation will be considered abandonment if they click on the link.
- Proper language selection
- The survey’s language must be the same as the language selected on the audience page, at the upper left corner of the Audience page.
- Questions about Age or Gender
- Pollfish shares by default each respondent's age range on the results page and their specific year of birth (and therefore age) in the downloadable Excel file.
- We also provide, by default, each respondent's gender in the results.
- Age restrictions regarding the survey's content
- Based on the content of the survey, you must target adults above 18 or 21 years old to take your survey if there is an age restriction in your targeted market.
- Sensitive questions and content
- Surveys including sensitive content must meet the three following criteria:
- Respondents must be adults above 18 years old. You can review your age targeting in the audience tab.
- The survey must contain one initial screening question stating the study's content, for example, ‘the following survey contains questions regarding alcoholic behavior. Are you willing to take part in the following survey? Your responses are anonymous.”
- Statement 1; Yes, I’m above the age of 18, and I’m giving you my consent.
- Statement 2; No, I do not wish to take part.
- Then, you must add one description question briefly explaining the content of the survey and why you want to know this information or how you will use it.
- Surveys including sensitive content must meet the three following criteria:
- Multiple Open-Ended questions combined in one question
- You must not combine multiple Open-Ended questions into one since it causes confusion and frustration to the respondents.
- Demographic questions
- We provide, by default, the demographic data of the respondents, so you don’t need to include questions to collect them.
- If you choose to include demographic questions, we will not provide the relevant demographic data, to avoid any repetition, which might affect our respondents' experience.
- A question with a topic that does not match its targeting
- When your question is aimed towards a specific demographic, you need to add Skip Logic to the previous question referencing the audience filters; this way, only the relevant audience will respond to this question, whereas the rest will skip it.
- Read more on how to implement advanced survey logic.
- Promotional content
- We do not allow any promotional content (e.g., website links, subscriptions, discounts, etc.) within the questionnaire. Pollfish is a market research platform and not a traffic provider.
Getting the Best Out of Surveys
Researchers should use a mobile-first online survey platform to get quality results at speed, as mobile dominates the digital space. No one wants to take surveys in a mobile environment that’s not adept for mobile devices.
Your online survey platform should also offer artificial intelligence and machine learning to remove low-quality data, disqualify low-quality data and offer a broad range of survey and question types.
The survey platform should offer advanced skip logic to route respondents to relevant follow-up questions based on their previous answers.
It should also allow you to survey any employee. As such, you’ll need a platform with a reach to millions of users, along with one that offers the Distribution Link feature. This feature will allow you to send your survey to specific respondents, instead of only deploying them across a vast network.
With Pollfish, you’ll have all of these capabilities, along with having your surveys reviewed and examined by a wealth of experts.

How to Implement an Advanced Design with Survey Logic
How to Implement an Advanced Design with Survey Logic

The Pollfish online survey platform is feature-rich, offering various methods of using survey logic in your surveys. Logic directs respondents to relevant questions, assuring you ask the correct follow-up questions based on their answers.
While the Pollfish online survey platform is intuitive, it can be overwhelming to maneuver between the different survey logic options at times.
This article explains the three main types of survey logic functions available on the Pollfish platform and how to use them to remove any ambiguity.
Understanding Survey Logic
Many providers of automated surveys offer the functionality of survey logic to augment the survey experience by routing respondents to the proper questions.
This is necessary, as not all respondents will respond with the same answers; as such, not all follow-up questions will be relevant to all respondents. Instead, they’ll need to be sent to questions that are logically next in line with the answers that your respondents provided.
That’s where survey logic comes into play.
The term “survey logic” denotes the mechanisms that change survey behavior, appearance and content based on the answers that respondents give.
Logic instills changes by way of automation, so the researchers don’t need to take action in order for the survey to make a set of certain functions. Instead, it saves the researchers manual labor by automating the survey functions.
Survey logic is mainly concerned with routing respondents to the relevant questions after they answer a question. It works by directing respondents to specific questions based on their answers.
How to Apply Survey Logic to Single-Selection and Matrix Questions
Understand survey logic by beginning with single-selection and single selection Matrix questions.
- Go to the Questionnaire section of the survey.


- Have your set of preliminary questions ready so that you are ready to apply logic.

- Choose the Single Select or Matrix Single Select question type(s).

- Go to the left-side menu panel and select “Apply logic” at the bottom.
- This is next to the tree branch icon, which also exists at the top left of the panel.
- Hence, this is why survey logic is sometimes referred to as “branching.”

- Add in the rules that will appear in the next interface.
- They will appear as such: “If the answer at Q1 (Question 1) is A, go to” “...”
- There, you can add where you want to direct the respondents.
- You have the option of seeing the logic path on the right side, showing you the flow of questions the respondents will undergo.

How to Apply Survey Logic to Multi-Selection Questions
In multi-selection questions, you cannot apply logic to just one question. Instead, you’ll need to do so in all the questions. This is because each answer is routed to a specific question, and since respondents can select multiple answers, they’ll be led to banks of questions.
- Have your set of questions ready, with rules established on how respondents are to be routed based on their answers.
- At each question, go to the left-side panel and click on “Apply logic.”
- This is the tree branch icon, situated right below the pencil icon and to the left of the “Multiple Selection” question type.

- This is the tree branch icon, situated right below the pencil icon and to the left of the “Multiple Selection” question type.
- Add in the rules to your logic based on each answer respondents can provide.
- For example, if in Q1 (Question 1), the answer choices are A, B, and C and D and each answer has 2 follow up questions that pertain to that answer choice, you must route the respondents to the proper follow-up questions based on the selections they make in Q1.
- Another example, the logic at Q1 is: if the answer is A go to Q2, if B, go to Q4, if C, go to Q6, if D, go to Q8. Those who answer A will answer Qs 2 and 3, B Qs 4 and 5, C Qs 6 and 7, and 8 and 9.
- But since it is a multi-select question, you must also apply logic at Q3 that states if B, go to Q4, if C, go to Q6, if D, go to Q8.
- Then at Q5, the order will be, if C, go to Q6, if D, go to Q8.
- Finally at Q7 should state, if D go to Q8.

- Apply the logic until the last question.
- This will create a ladder of logic, with layers in each question.

- This will create a ladder of logic, with layers in each question.
How to Apply Survey Logic to Reference an Answer from a Previous Question
You can refer back to an earlier question to determine the path the respondent will take in the survey by applying logic.
As such, you can use a scenario in which all of your respondents will be directed to a set of questions, for example, questions 1-7. But, you seek to apply logic to only questions 8-11. You can do so when you apply logic.
- Have your set of questions ready, with rules established on how respondents are to be routed based on their answers.
- At each question, go to the left-side panel and click on “Apply logic.”
- This is the tree branch icon, situated right below the pencil icon and to the left of the question type.
- You may not need to apply logic to every question.
- Take the following example to insert an answer from a previous question.
- There is a survey that asks in Q1: “What is your favorite baseball team?”
- Qs 2-5 are universal questions that all respondents can answer and are about baseball in general.
 On Q’s 6-10, let’s say you want to ask questions specific to those who selected the Yankees in Q1.
- As such, in Q5 you would insert logic that dictates the following: if the answer at Q1 was Yankees go to Q6, in any other case, end the survey so only those who chose the Yankees will answer only Qs 6-10.

- As such, in Q5 you would insert logic that dictates the following: if the answer at Q1 was Yankees go to Q6, in any other case, end the survey so only those who chose the Yankees will answer only Qs 6-10.
Designing the Perfect Survey
To design a strong survey, you’ll need to apply survey logic to different kinds of questions. This advanced feature is invaluable but can create roadblocks when applying it to different types of questions.
You should therefore know how the three main survey logic scenarios differ and how to use this function in all three.
In addition, to adequately run this kind of survey function, you’ll need to use a quality online survey platform, the kind that makes it easy to create and deploy surveys.
You should also use a mobile-first platform since mobile dominates the digital space and no one wants to take surveys in a mobile environment that’s not adept for mobile devices.
Your online survey platform should also offer artificial intelligence and machine learning to remove low-quality data, disqualify low-quality data and offer a broad range of survey and question types.
Additionally, it should also allow you to survey anyone. As such, you’ll need a platform with a reach to millions of consumers, along with one that offers the Distribution Link feature.
With an online survey platform with all of these capabilities, you’ll be able to set up survey logic for all your campaign survey needs.

How to Use Concept Rules in Your Monadic and Sequential Survey
How to Use Concept Rules in Your Monadic and Sequential Survey

What can I achieve with concept rules?
With concept rules, you can differentiate the follow-up questions a respondent gets and obtain better insights from the test. The evaluation questions of the test will remain the same for all concepts, no logic can be applied within the questions of the test.
By using concept rules in your monadic or sequential test, you can direct the respondent - after he finishes with the evaluation questions, to follow-up questions curated specifically for the concept or concepts he got.
For example, for a monadic test, you can make follow-up comparison questions that test how a respondent perceives the product he saw in comparison to another one.
How do concept rules work?
You can apply concept rules at the AB group, so that when the respondent finishes with the questions of the AB, to be redirected to a specific question outside of the group based on the concept they got.

You can also apply complex rules containing concept rules, in the case you want to combine specific answers from regular questions with concepts shown.
- Add a monadic or sequential test to your survey
- Open the logic page
A. For simple rules:
- Select the question or the ab test group, you want to apply the rules
- In the rule, you can select the “if concept at” and pick the concept you want to apply the rule
- You can add rules for all concepts or for some of the concepts
For example, let’s assume that you want to conduct a monadic test for 3 soft drinks, and have the respondents compare 2 out of these 3 in the case they got one of these 2 in their monadic.
B. For complex rules, combining concepts with answer questions:
i. Select the question or the ab test group, you want to apply the rules
ii. In the rule, you can select the “if concept at” to pick the concept you want to apply the rule, click “Add” and select “if answer at” to pick the question’s answer you want to add.
For example, let’s assume that you want to conduct a monadic test for 2 soft drinks, and drive the respondent to answer a specific follow up question provided that he has also given a specific answer to a regular question (outside of the A/B)
What is the mobile flow a respondent gets with concept rules applied?
For the first case of rules(2a), the respondent will follow the following flow: Pollfish Survey
For the second case of rules(2b), the respondent will follow the following flow:
Or this: Pollfish Survey
Can I combine a sequential test with concept rules?

Yes, for a sequential test, you can apply concept rules with complex logic if needed. For example, you can conduct a sequential test for a respondent to view 2 out of 3 concepts, and based on the concepts he got, make a comparison after the sequential questions finish.
Here you can find how to set up such a sequential test with a follow-up comparison question:
Here you will preview what the respondent gets: Pollfish Survey

New Pollfish Feature: Sequential Testing, A Variation of Monadic Testing
New Pollfish Feature: Sequential Testing, A Variation of Monadic Testing
The Pollfish A/B testing functionality just keeps getting stronger; we now offer another version of it to fortify all your concept testing needs with the Sequential Testing version. In this second version of A/B testing, researchers can test multiple concepts at once, as opposed to just one with monadic.
In this second iteration, the testing is also done within one group of questions but allows researchers to test more concepts per respondent. This grants researchers added flexibility and efficiency, as only one survey can test multiple concepts.
This version is available for all accounts on the Pollfish platform.
This article explains sequential testing, how to use it in the Pollfish platform and the three versions Pollfish offers.
Understanding Sequential Testing
Sequential testing affects the cost of the survey by way of the following calculation:
The calculation cost formula:
(the # of questions included in the A/B test) X (# of concepts presented to the respondent)
Example:
Questions in the A/B test: 12
Number of concepts presented: 4
12 X 4 = 48
As such, in a basic plan, the CPI will be for $4 (46-50 questions) )
Question Distribution
In this version of the A/B test, concepts have a specific distribution: all possible combinations are derived from the concepts that are selected to be shown. This way, each concept is evenly distributed and presented to the respondents at equal times in the first position.
This reduces any bias that may occur from serving a concept always at the first position of a combination.
Example:
Sequential x 2 selected concepts per respondent out of 3 concepts (A, B,C)
A sampling pool of 300 respondents
We have the following combinations of 2 out of the 3 concepts:
AB, BC, AC
This means that each concept will be seen by more participants than it would in the monadic version. For the example of 300 respondents, each concept will be seen by 200 respondents or a total of 600 views for all concepts.
The distribution should take place evenly for all combinations (300 respondents / 3 combinations = 100 responses/combination)
AB or BA x 100
BC or CB x 100
AC or CA x 100
Results and Exports
The results and exports will be presented as they are in the monadic testing version. However, the difference lies in that each concept will have accrued more views and responses than it would have in the monadic version.
This is understandable, given that sequential testing involves implementing more concepts, therefore yielding more responses and combinations.
What You’ll Find in the Charts of Sequential Testing
Each question type included in a sequential test (and a monadic test) will be accompanied by a chart.
A bar chart contains columns as concepts or answers, depending on the view you select. The data from the table is used for the charts.
On the top right-hand corner of the questions you applied sequential testing to, you can check results in two ways. Just click on the “View” dropdown and choose between by concept and by results, where applicable.
Slider and numeric open-ended questions are presented with a box plot diagram, per concept.
A boxplot is a standardized way of displaying the distribution of data based on a five-number summary (“minimum”, first quartile (Q1), median, third quartile (Q3), and “maximum”). It tells you about your outliers and what their values are.
It can also tell you if your data is symmetrical, how tightly your data is grouped, and if and how your data is skewed.
Box plots are presented on the results page, as this image shows:
The Benefits of a Sequential Test
The main benefit of a sequential testing approach is the improved efficiency of the test. This is because, in sequential testing, each respondent views either all potential concepts or a limited number of concepts, followed by the same evaluation questions for each.
Viewing more concepts and answering for more concepts in just one survey, is far more efficient than testing individually in a non-A/B test setting.
With both monadic and sequential A/B testing, researchers can incorporate many concepts. The key difference is the mechanism that distributes these concepts. In the monadic version, each respondent views and answers for only one random concept whereas in the sequential, they view more and answer for more concepts.
As such, the sequential version grants researchers an added layer of flexibility in their concept setup.
The sequential approach is data-rich, as the Pollfish platform allows researchers to filter their data in regards to each concept, both by concept and answers. This provides a much more granular display of exactly how each concept was received. Best of all, it is provided in one place, on one page.
How to Set Up a Sequential Test
Setting up a sequential A/B test is a fairly simple task. Here are the steps to set up and use the sequential version:
- For the questionnaire, add an A/B test.
- Under “type,” select the sequential type.


- In the concepts table, add as many concepts as you need.
- You can also add attributes.
- In the number of concepts to be presented per respondent, select how many of them each respondent will view.
- (The number of concepts to be presented to the user cannot be bigger than the number of concepts in the concepts table).

- (The number of concepts to be presented to the user cannot be bigger than the number of concepts in the concepts table).
- Define the questions that will be in the test.
- Proceed to the checkout.
Innovating with Sequential Testing
This version of A/B testing is not just ideal for testing ideas, but for breeding innovation, all from one survey. This is because researchers can use sequential testing questions along with regular questions in one survey.
This allows researchers to test their concepts with each respondent, as this is a version of the monadic test.
So go ahead, use all the concepts in one test as you please, for all your market research campaign needs. Or, stick to just a few.

How to Do Away with Typos With the Edit Questionnaire Feature
How to Do Away with Typos With the Edit Questionnaire Feature
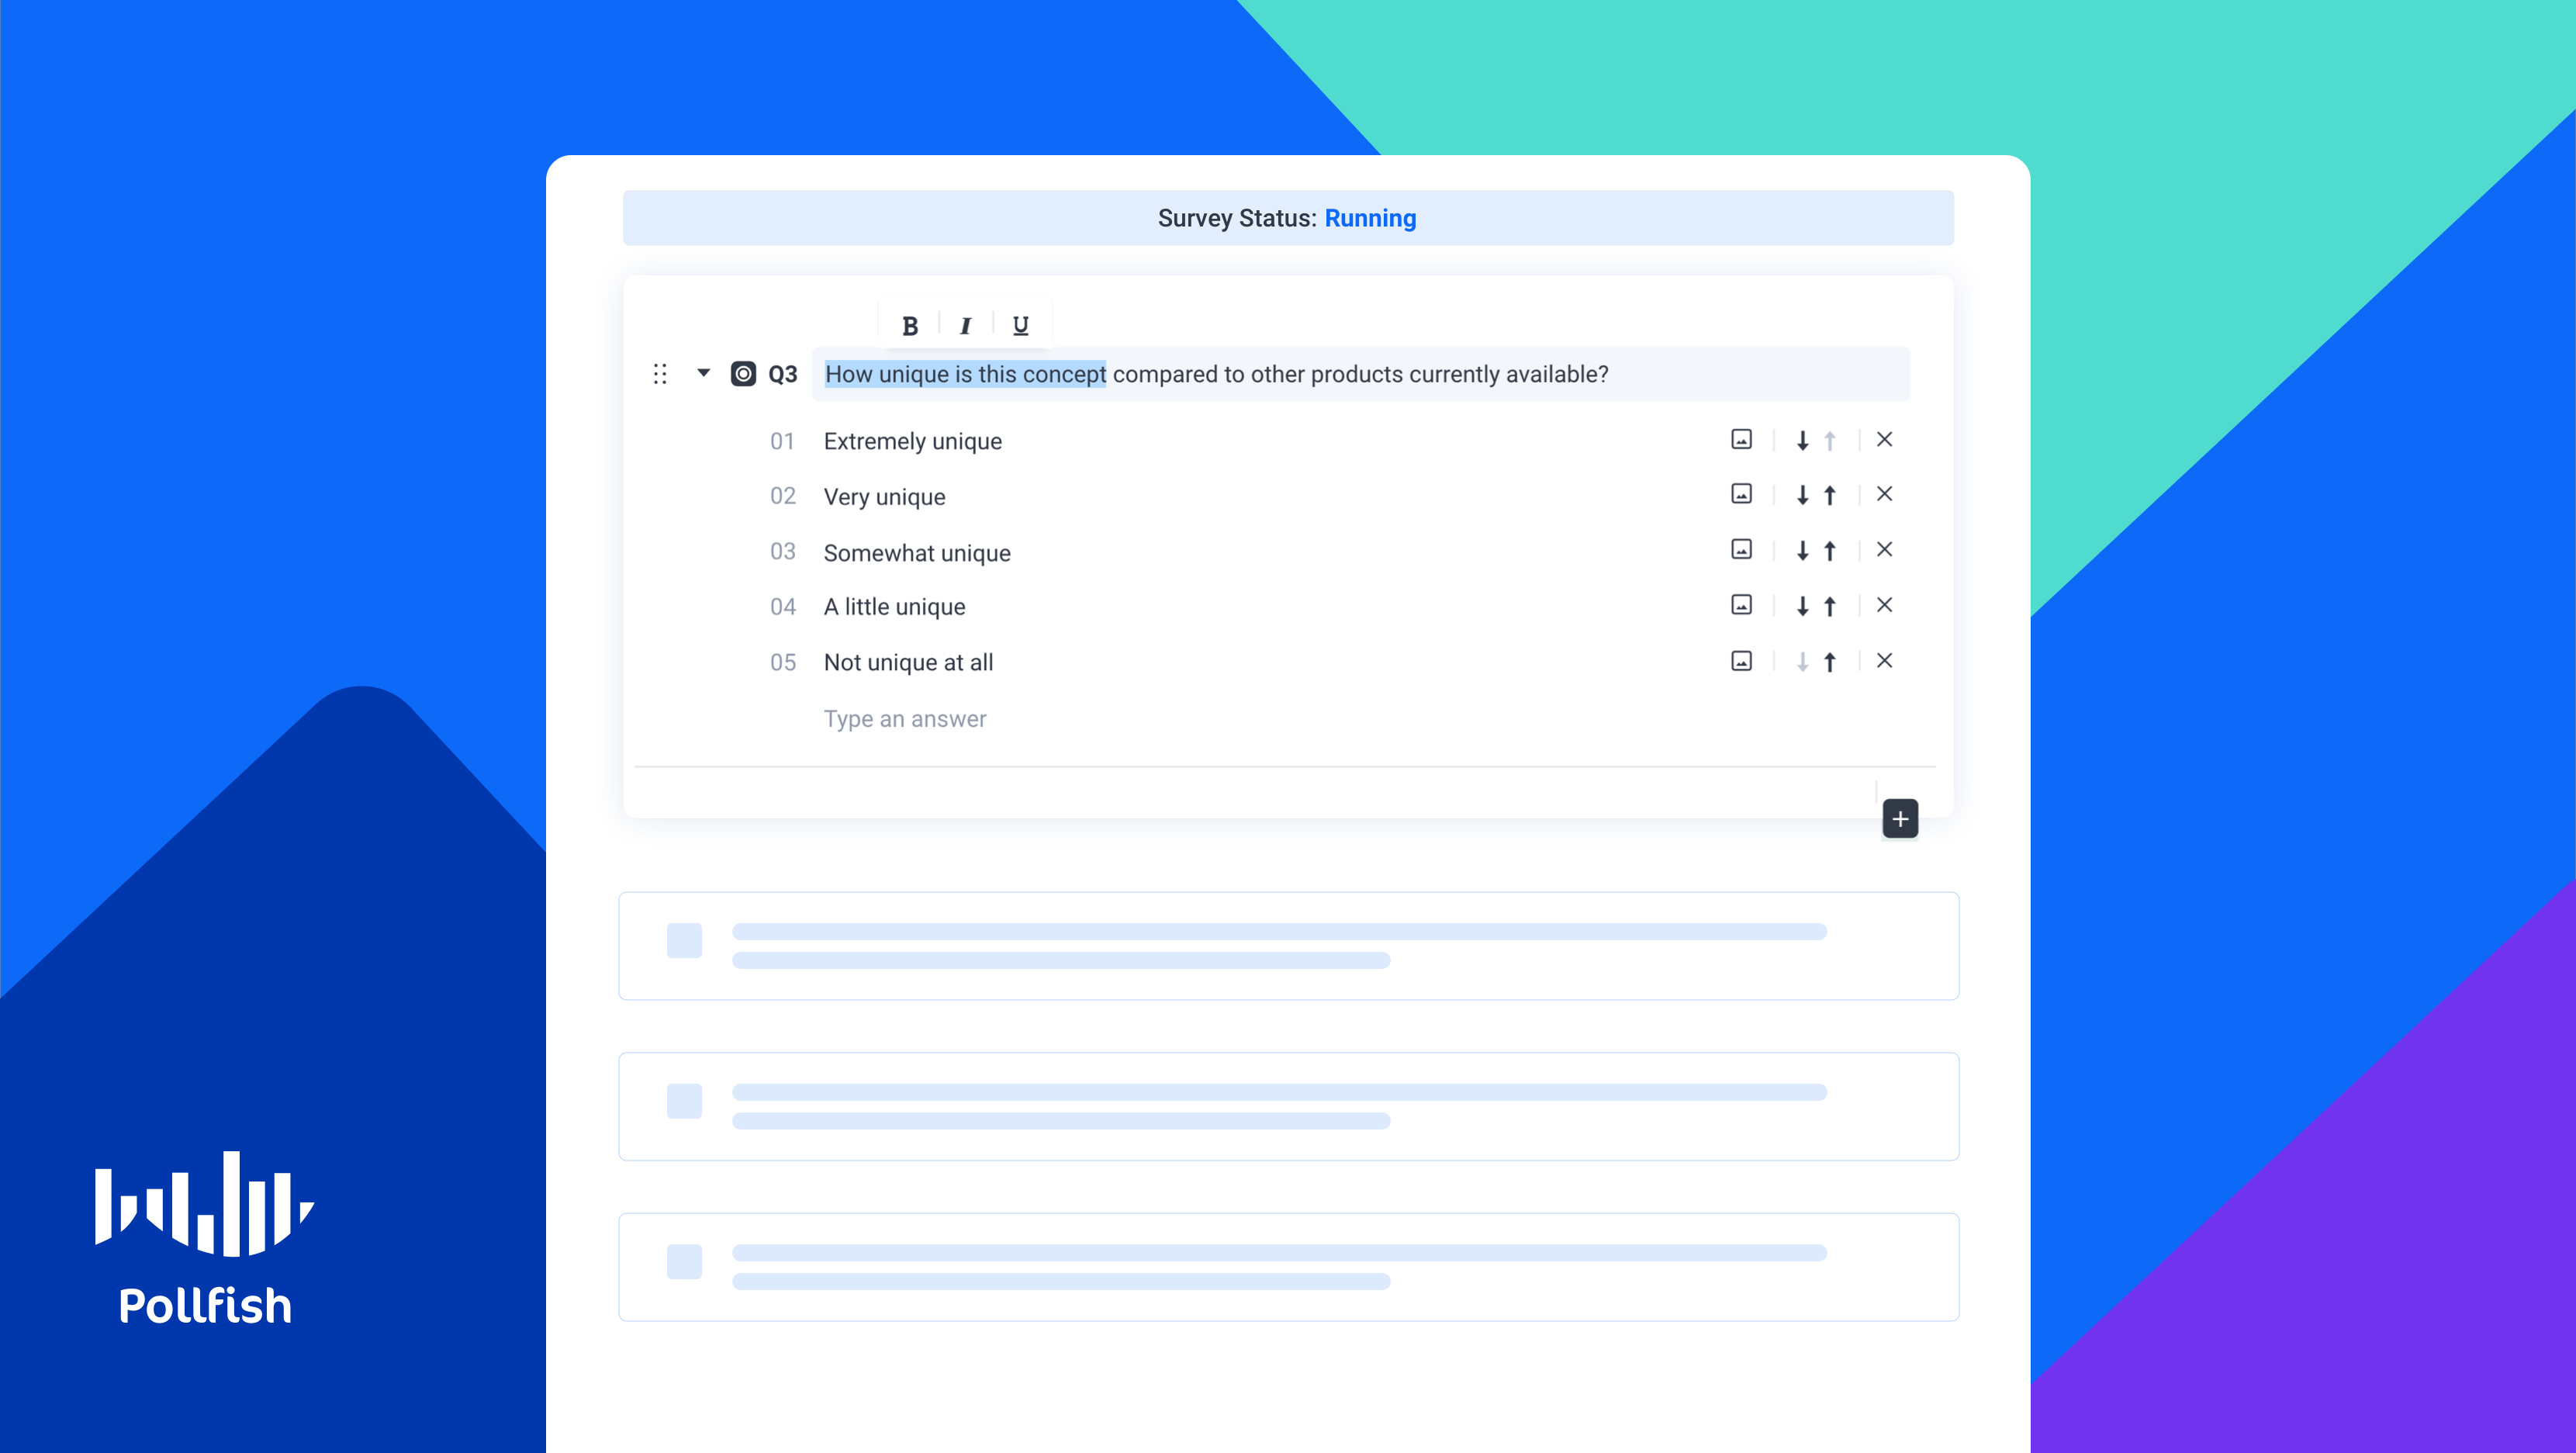
When forming the questionnaire — the heart of the survey — even the most diligent market researchers are bound to come upon errors. At Pollfish, we’ve created a solution that can nip this issue in the bud without needing to slow down the survey process.
Pollfish has released a new feature that allows researchers to quickly remove typos and correct any text-based errors in all surveys.
With the new Edit Questionnaire feature, researchers can edit their typos and other text if need be, in any survey they choose, regardless if the survey is still running or complete. This creates a much more smooth survey experience for the researchers, as they don’t have to stop a running survey, or even pause it to adjust textual errors.
This article explains how to use the Edit Questionnaire feature and how any market research campaign can benefit from it.
Understanding the Edit Questionnaire Feature
Market researchers have likely caught a typo error in a running survey in the results of a completed survey. Researchers now have the ability to correct typos and edit all text fields regardless of the survey status, thanks to the Pollfish Edit Questionnaire feature.
This includes making the corrections and other textual edits in questions, answers, statements, scale points, concepts, etc.)
This new feature is available to all researchers under all of our plans.
The Edit Questionnaire does not require researchers to make any status changes to the survey they are editing. As such, researchers don’t need to pause, stop or resume any survey they use this feature with.
The Usefulness of the Edit Questionnaire Feature
This feature is useful for virtually any survey research campaign, as it equips market researchers with a handy and practical way of fixing typos without halting or pausing a survey. Typos can occur even among the most meticulous researchers. It isn’t practical to stop a survey or change its status, as this delays the survey process.
The Edit Questionnaire feature is the solution to this pesky issue, as researchers can now fix typos within their running studies and share them with their peers. They can do so without stopping a running survey or duplicating it to launch a copy. They can edit any text while the platform is deploying surveys and extracting responses.
This is useful as it helps researchers make changes as soon as they find them, allowing them to edit their questions as they please.
How to Use the Edit Questionnaire Feature
In line with the Pollfish commitment to user-friendliness, this new feature offers ease of use and efficiency. The following explains how to use the Edit Questionnaire feature on the Pollfish platform.

- On the Pollfish dashboard, go to the surveys and hover over the survey you would like to edit.
- Here, you’ll find the three-dot button that grants you options on changing the survey status and using a feature.
- Click on the three-dot button on the right of the survey you would like to edit.
- A dropdown menu will appear.
- Click on “Edit Questionnaire” and you will be taken to the questionnaire of the survey you clicked on, which you can then edit.
- The ‘’Audience’’ & ‘’Checkout’’ pages will be grayed out.
- Here, you can also apply changes to the ‘’recall information’’ option. The rest of the options at the left panel are grayed out (carry forward, skip logic, etc).
- However, you can review (only) the ‘’apply logic’’ rules per question.
- Select “save changes’’ in the questionnaire page to save any changes you made.
- After clicking on ‘’save changes’, these changes will be reflected on the results page.
- Please bear in mind that there is no ‘’auto-save’’ button.
- When the survey’s status is ‘’Under edit’’ (Edit Audience), the option ‘’Edit Questionnaire’’ is also available.
- If you want to discard your changes, click back and confirm the action.
Creating Quality Surveys
In summary, researchers can improve the quality of their surveys as their surveys are running. They can ward off both their own typos along with those of their respondents. After hitting “save,” the changes become instantly available to respondents and the results.
Thus, using this feature is effective and friction-free.
Remember, as our surveys are running, our online survey platform uses AI and machine learning along with random device engagement (RDE) sampling to ensure the highest quality of responses.
Machine learning performs quality checks that disqualify gibberish and other low-quality answers, those using a VPN. RDE sampling engages digital users across a wide net of digital properties, without pre-recruiting them to take a survey.
The Pollfish platform is, therefore, best equipped to extract and deliver the best results.